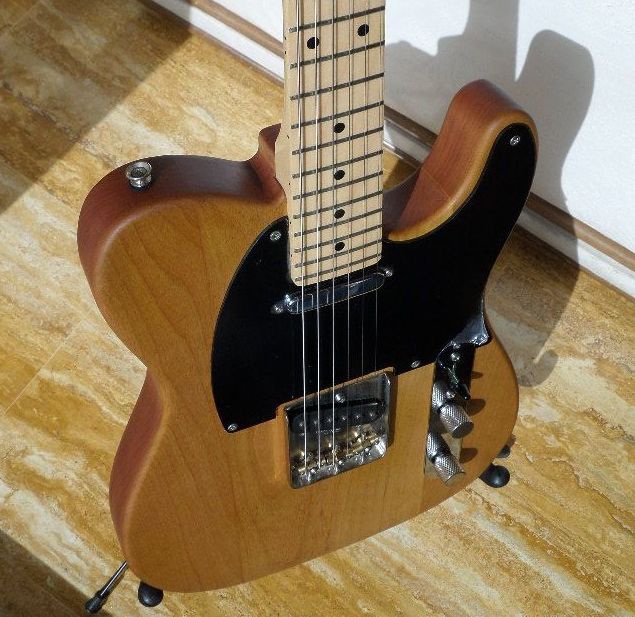
In previous installments I wrote about the fight against corroded parts on a a very cheap bass guitar. Now I’m gonna address the other areas I had to work with to make it an dependable instrument.
I’d say the only parts that had no rust were the tuners. I just cleaned them and applied TPF lube to make them turn smoothly. At last, an easy job!!
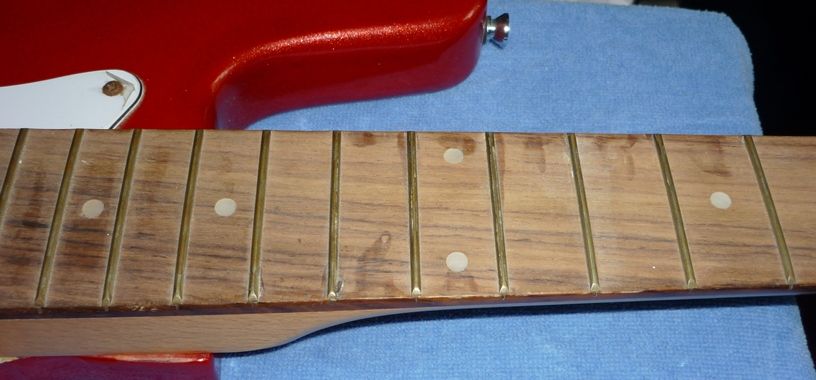
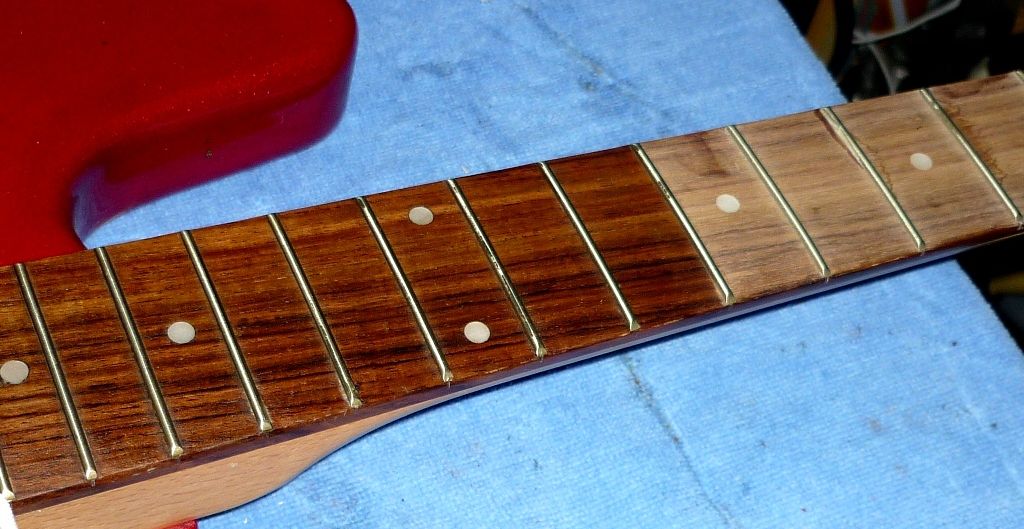
The frets, however, had only very superficial rust. I was able to polish away the corrosion. But the fretboard was horrible! It looked dull and white-ish. It turns out the wood wasn’t treated at the factory. Had the bass been stored in a dry place, the fretboard might have been cracked. Even worse, there were glue marks, probably leftovers from the inlay work. This wasn’t a cheap guitar, but a sloppy mess instead!!
I had to grind away the fretboard with steel wool to get rid of most of the dried glue. Afterwards I applied an oil finish with a dark tint mixed in it. What a difference! I took a picture to show the “before / after” look.
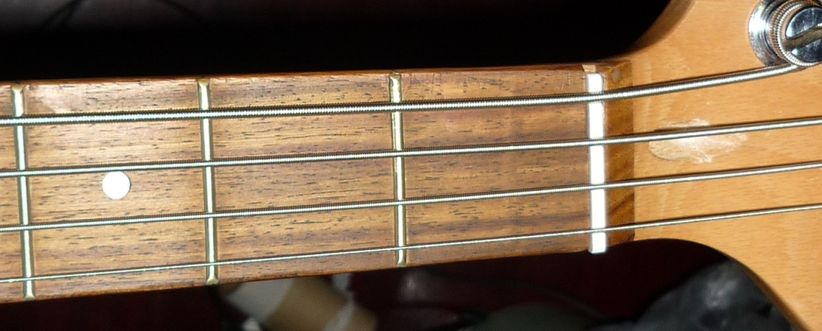
The nut was also a miss. It was smaller than the neck and it was loose. I decided to carve a new one out of real bone instead of plastic: when installing a better pickup is not an option, a bone (or brass) nut is the next best thing you can do to improve the tone of any guitar.
Jazz Bass nut on a Precision.
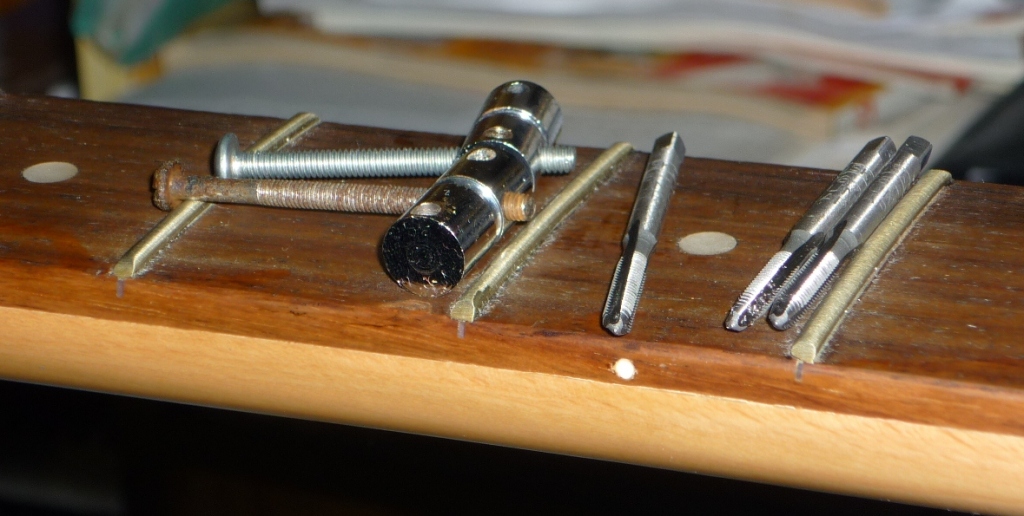
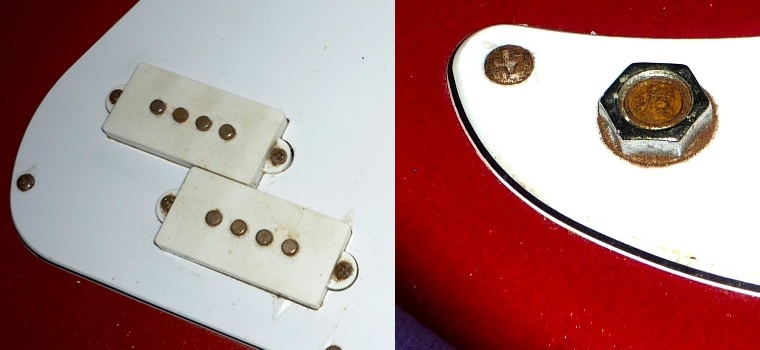
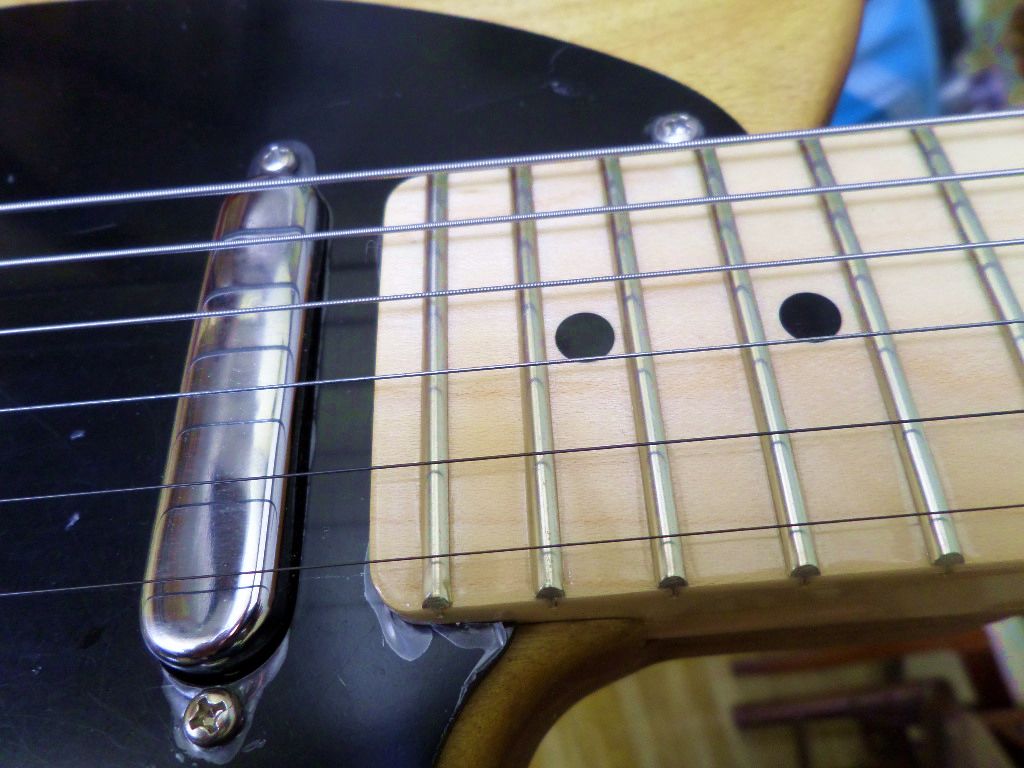
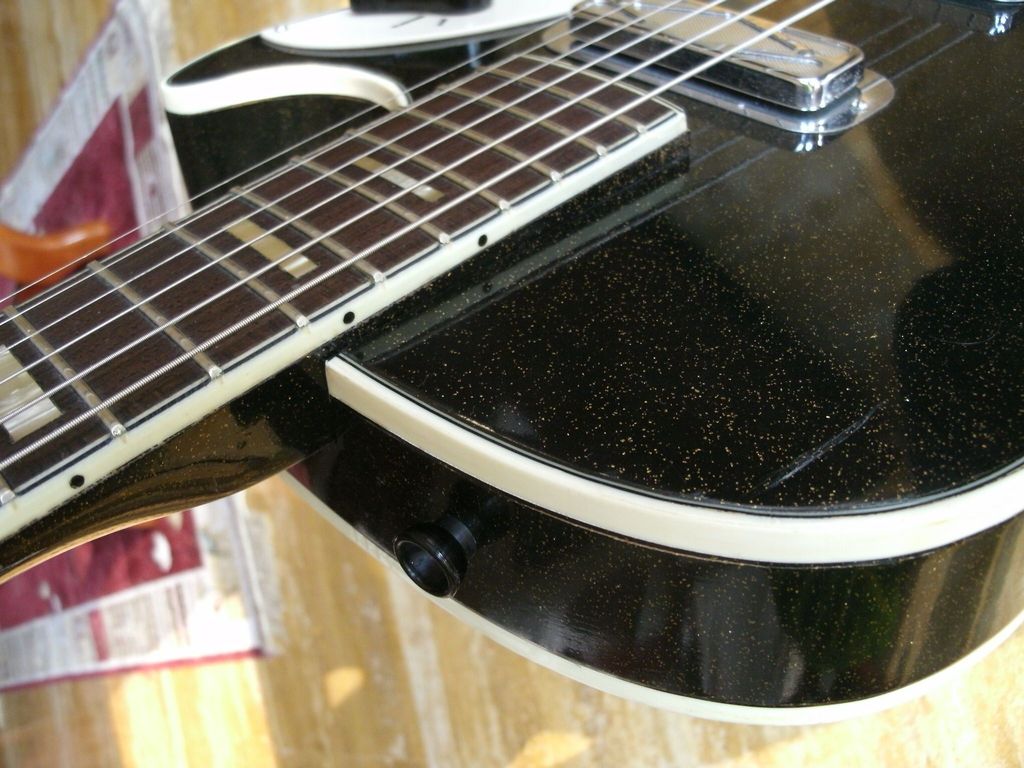
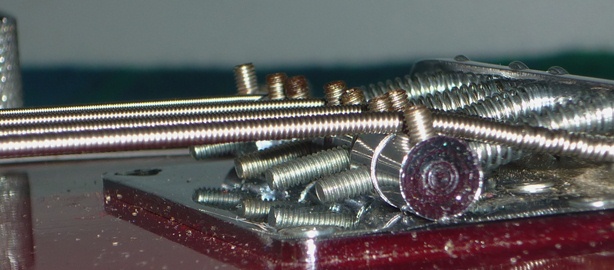
The screws of the bridge saddles were corroded as well (no surprise here). It was difficult to extract them, and one simply got broken in the process. I bought new screws and tapped the saddles to match the beefier size.
At last, it was time to build the circuitry. Again, corrosion destroyed all the screws. But the pickup was working, so I simply removed the surface rust on the poles and covered them with clear lacquer to help protect them from sweat. Afterwards I bought brand new pots and an output jack.
I hadn’t seen rust like that. I mean, even inside the jack?
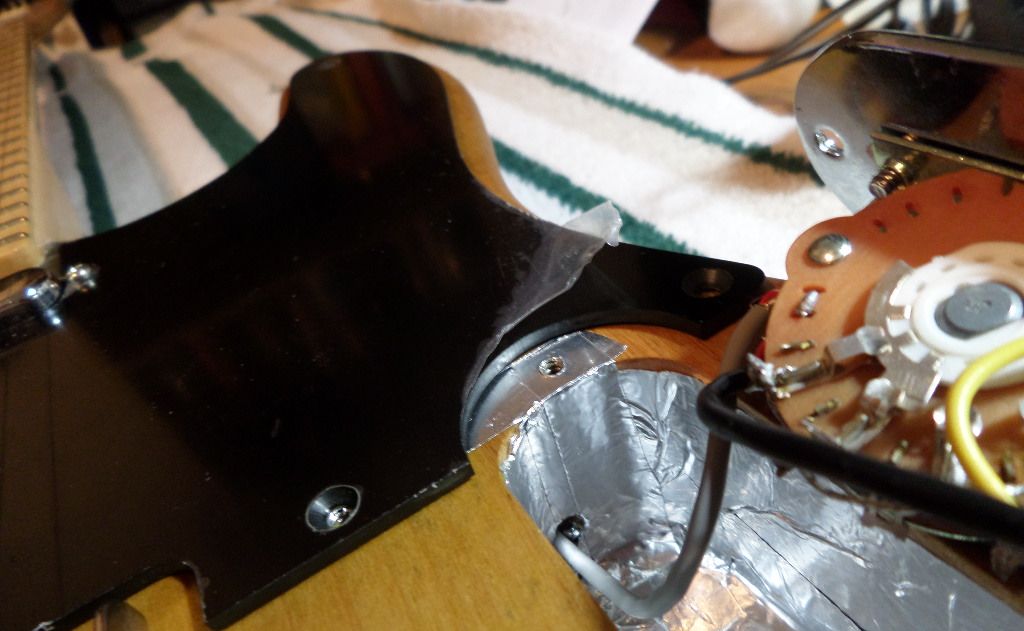
I decided to build a full shielding (Faraday Cage) for the electronics so the bass can be used anywhere with minimal noise. I prefer aluminum tape instead of copper because it’s cheaper, easier to work with, and much easier to find.
The repositioned bridge hides the remnants of the old screws very nicely!
Once the shielding was complete, I assembled the whole instrument and got ready for the final battle: getting a low action!
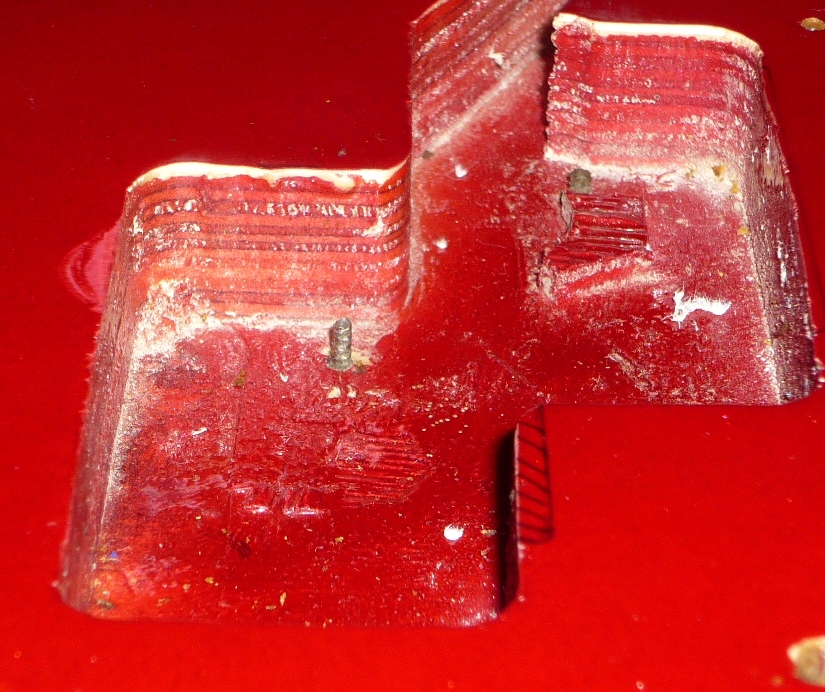
In the previous installment I showed you a bass guitar whose screws were so rusted there was no way to extract them. Since it was a very cheap instrument, I decided to keep the remains of the screws in it and drill new holes beside them. To do so, I moved the pickguard 4 mm towards the bridge and found out I now had to adjust the cavity where the pickup sits.
Once again, the pickup mounting screws were so rusted they broke their heads off. At least this time I had a little bit of useable metal, so I extracted them with the good ol’ Vice-grip.
In the picture you can see the marks I made to guide the router. It can also be seen how the body is made out of plywood. Not the best tonewood, but that’s not the point of this bass: it’s all about providing a low-cost instrument for a beginner.
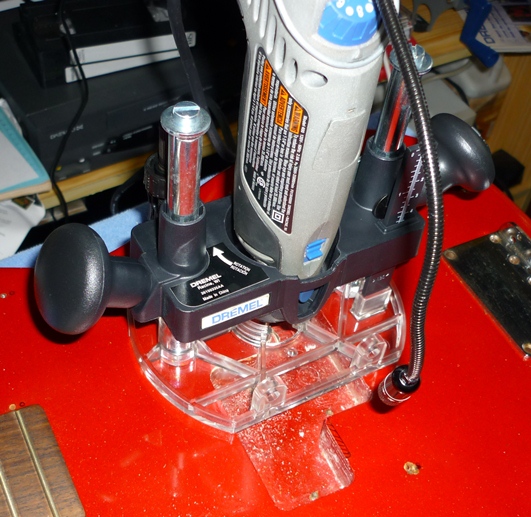
To adjust the cavity, I used my Dremel 400 series with the 335 routing attachment, coupled to a #115 tool. The best move would have been to go to the hardware store and get the #654, but I was in a hurry and started to work with the one I had.
The flexible spotlight is amazing.
Since the #115 tool was somewhat slow, I applied myself a bit more to make a quicker cut. BIG MISTAKE! I just managed to burn the plywood, as it can be seen in the picture. That’s what I got for not having the right tool for the job. Grrr…
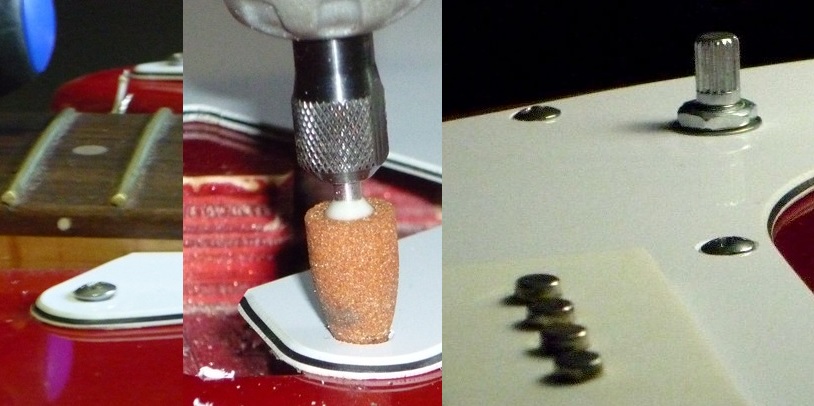
Once the routing was done I placed the pickguard to make the pilot holes for the new screws. The blue masking tape is a low-tack type, so it doesn’t leave sticky residues on the finish.
For the pilot holes I needed a 3/64″ drill bit. This time I already had the right tools for the job: the Dremel # 628 drill bit set, along with the 4485 smaller collet set.
Oh, the joy of using proper tools! In less than a minute I had all the holes ready and started to screw in the new ones. And then I found out their heads were bigger than the original ones, so they stood a little proud. To make them flush I used the grinding tool Dremel 952 at medium speed. The pickguard is so soft that it only needed a little touch to get a nice shape. The result is very pleasing to the eye:
After that, I went to the bridge and did the same trick: drilling new holes beside the rusty old screws. You can see the cords I used to set the bridge alignment. Since the lowest string is much thicker than the rest, the bridge has to be mounted slightly off-centered; otherwise the 4th string could be too close to the edge of the fretboard. Everything has a secret!
In the next installment I’ll show you the other smaller things needed to wrap up the work, such as the electronics overhaul.
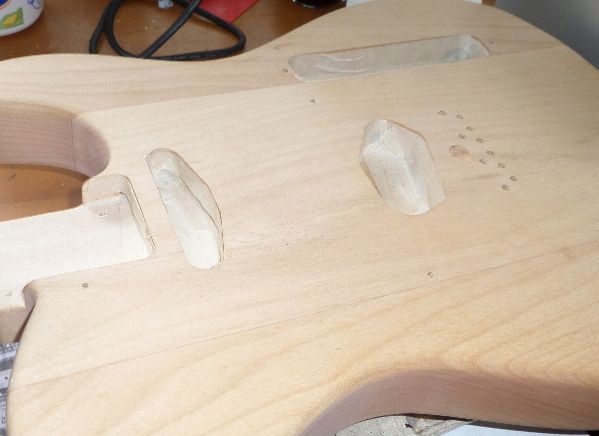
Recently I was given the task of building a guitar for Todo Música Latinoamérica, an online retailer who sells guitar parts and luthiery tools.
The idea was to assemble a guitar to showcase some of the best parts available in their catalog. True to his vintage tastes, Pedro Salas, CEO of Todo Música chose a Telecaster-like one. He chose the following parts from his “stash”:
The Electrosocket is the best one for Telecasters, period.
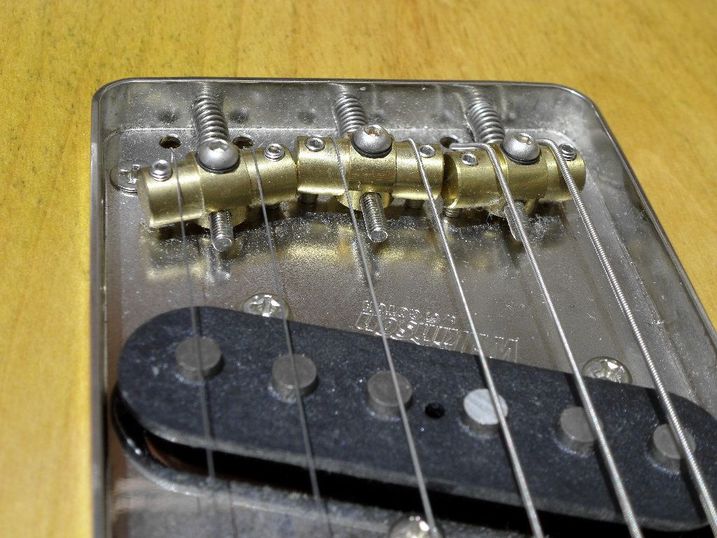
The Wilkinson bridge deserves a special mention. Hardcore Telecaster fans swear by the original three-saddle bridge, but that design makes good intonation almost impossible since every saddle has to serve two strings. The best option is to to have every string resting on its own saddle to be compensated correctly. This Wilkinson bridge offers a smart option: each saddle has a central pivot that can be locked in the correct position to ensure a better adjustment. While it certainly isn’t as easy to use as a six-saddle bridge, I was able to get a correct intonation with it, something that can’t be said about the vintage three-saddle design.
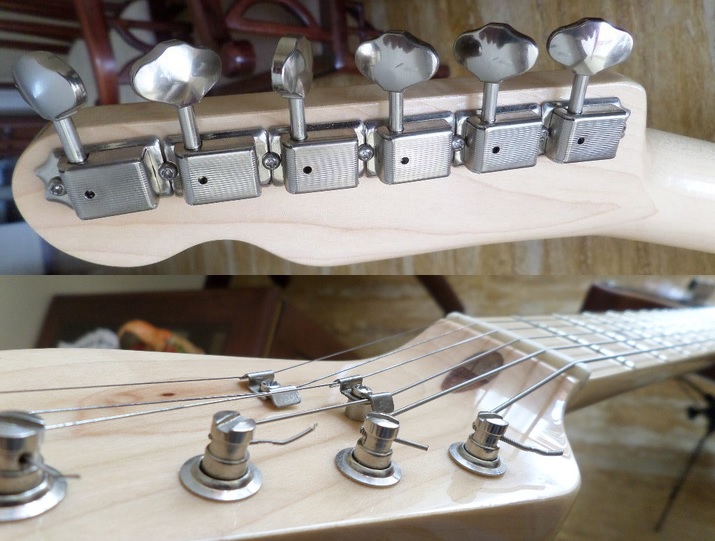
The Gotoh tuners are locking ones but they share the same shape and dimensions as the vintage Fenders, so there’s not a visual difference between these and the ones they replace. A really good design!
Locking tuners, baby!
I chose to apply a tung oil finish to let the beauty of the wood speak for itself. I think most builders use thick polyurethane finishes to hide imperfections, but the swamp ash of this body was so good I wanted players to feel its texture.
Not a speck of paint should get to the cavities.
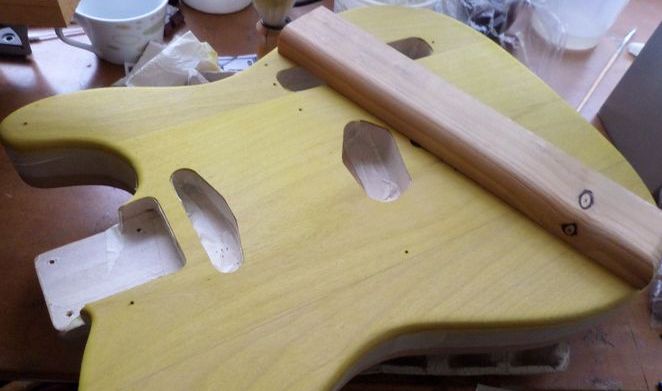
I also wanted to try a “greener” method to paint the wood. Instead of using common wood tints, I applied vegetable tints right over the body. Once I had it painted I applied several coats of tung oil and a final one of beeswax. This body is not only protected against mold and bacteria, but VOC-free and also allergens-free as well!
To showcase the possibilities of these tints, I decided to paint the front in yellow and give the sides and back a reddish hue. I did the yellow tone with Turmeric powder, and it gave such a bold shade with the first coat that I just had to apply it once!
That stick is the same color as the body was. That’s after just one coat of Turmeric!
I painted over the yellow part with a mix of tea with a little vinegar, applied with steel wool. This somewhat unorthodox method is used to create and “aged” finish, which gave the front a more subdued, elegant charm. (The turmeric yellow was too intense!)
I did the reddish sides and back with a mix of Hibiscus, Cocoa, and Coffee. The reason I did this mix was to get away from the bright red of the Hibiscus, since I wanted a more subtle effect. I managed to get a Mahogany-like hue, and diluted it to have a better control over the final result: I could get a more intense color by applying several coats, but if the tint was too strong there wouldn’t be an easy way to tame it down!
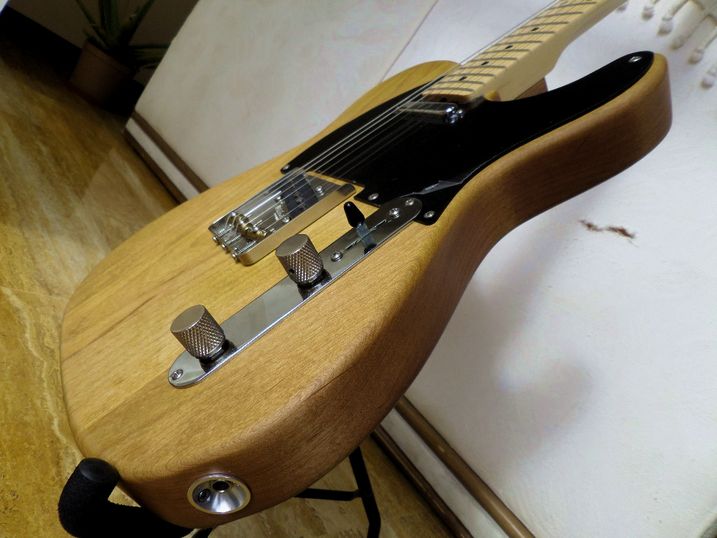
I did the transition from red to yellow right over the rounded part, to get away from the typical “burst” finish over the front, and was very proud of the subtle transition from one tone to the other: it goes unnoticed unless you get really close to it.
After the coloring procedures I applied a few coats of tung oil over several weeks (it’s best to leave each coat to polimerize for a fews days each) and finished it all with hand-rubbed beeswax to repel water. The results were excellent: a very smooth texture with a soft natural shine. The front color looks similar to vintage amber and the sides and back look like mahogany or moka coffee depending of the lighting.
Yummy!
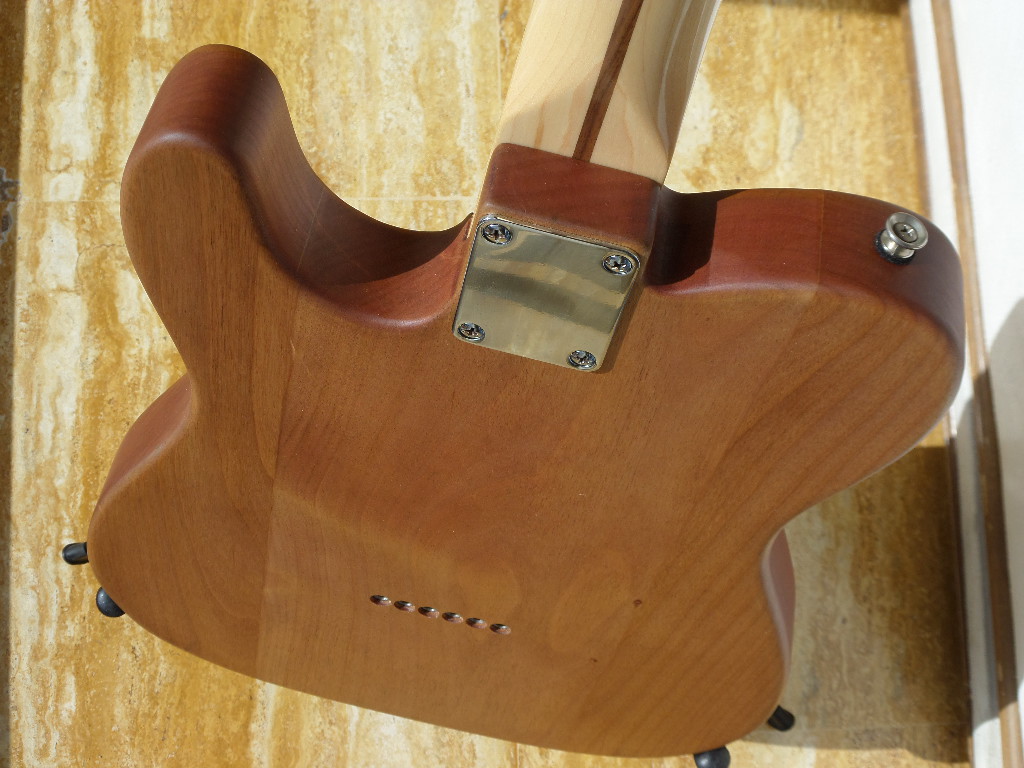
Once the finish process was completed, I did a full shielding job that included the pickup cavities and the back of the pickguard. These vintage-like pickups sound sweet, but they can be noisy! A good shielding from electromagnetic hum is a must on any contemporary guitar.
I added a sliver of aluminium tape to connect the foil on the back of the pickguard with the one in the electronics cavity. Once the pickguard screws are in, it becomes one big Faraday’s Cage.
Once the electronics were installed, I did the setup the way I prefer: with the lowest possible action. It’s easy to raise the action from its minimum, but the opposite is not. The last part of the process was to file and polish the nut to a mirror-like shine with my trusty Dremel tool.
I always polish frets to a mirror-like shine.
The use of vegetable-based tints comes from ancient traditions, long forgotten since the advent of cheaper synthetic dyes in the 19th century. But now we are facing a future full of new health and enviromental issues. Being able to do a guitar finish with non-polluting, allergen-free products is another step in the right direction; or at least to an era where the best practices might as well be the same ones employed by our pre-industrial ancestors.
I’d like to thank Pedro Salas from Todo Música Latinoamérica for his patience and total trust in my abilities, Kris De Decker for his inspiration to search for ancient alternatives to modern technology, and Anthony Murkar, Steve Ramsey, and the Colorful Canary blog for sharing their knowledge with the world.
I have to say I have no affiliations with the trademarks mentioned in this article. Their names have been used here only for informative purposes.
We always hear about learning life lessons thru other people’s or your own experiences. I have learn some thanks to my bass guitar.
My faithful 5-string is a Curbow, specially designed by the late Greg Curbow to be crafted by the Cort factory in South Korea. My other options were a Steinberger Spirit XZ-25 and a Tobias Toby Pro 5. (This was way back in 2000, during the MusicYo! era).
I can say that both the Tobias and the Steinberger needed some customizing to be able to meet my demands, but as soon as I got the Curbow, there was no turning back: I found exactly what I was looking for. And as it happens with any human interaction, each virtue is also a defect at once. It all depends ot your viewpoint.
What my Curbow taught me was that features, simply, are. But is our perception what morph them into good or bad ones, just like people. The same person that can be seen as “perseverant” can be described by others as “stubborn”.
So… following my time-honored (or boring) analytical mind, I wrote some features of my Curbow bass. And as you will see, each one can be seen as either a defect or a virtue.
How many times have we wondered how can someone be attracted to certain person? Why something we are proud of can be an annoyance to others? For example, I have played with great guitar virtuosos who had to be replaced because our music was boring for them, and their work suffered because of that. They turned a great gift into a defect for the band.
When it comes to my bass, I am a very skinny guy so I prefer a small and lightweight instrument. However, I let a very large man play my Curbow once and they looked ridiculously fun together! Too bad I didn’t took a picture, but it looked like this:
While many people love the Curbow looks, I still remember a sound engineer who told me “Wow, your bass looks SO GAY!”. Maybe he expected me to use a battered P-bass for a hard rock band instead of a petite, curvaceous beauty. However, after the concert he said: “Your bass still looks gay, but it sounds amazing!”
Right there lies another lesson: so many times we are annoyed by one negative comment instead of the majority of positive reactions to our work. Why does it bother so much? Is that person someone you trust, or an expert in the field? Why does he care? Is he paying for our work?
As seen before, his comment was about the contrast between a tough rock band image and the delicate shape of my bass. Sometimes that can be useful to attract attention (a common issue for bass players, hehe), but at the end, the Curbow’s tone was undeniable.
And that’s yet another lesson: if you’re doing a good job, everything else is meaningless. I could have gotten a Precision bass like anyone else, but I can’t stand neither its weight, nor the thick neck shape, nor the fact it has an enormous neck heel that forces to stick the thumb out, nor the fact it only has 20 frets. My Curbow is lightweight, comfortable, has easy access to each of its 27 frets, and (unlike most Fenders) can be setup with a very low action even with my preferred thicker gauge strings. And its sound is unique yet versatile.
At the end, the biggest life lesson given by my Curbow is to keep focused into what’s really important for me. I don’t have to settle for what others think I need. Yes, I should listen carefully to their advice, learn from their wisdom, but work towards getting what I need and want, because not everyone has the same needs and desires.
Thank you, Maestro Greg Curbow, for creating the bass I needed.
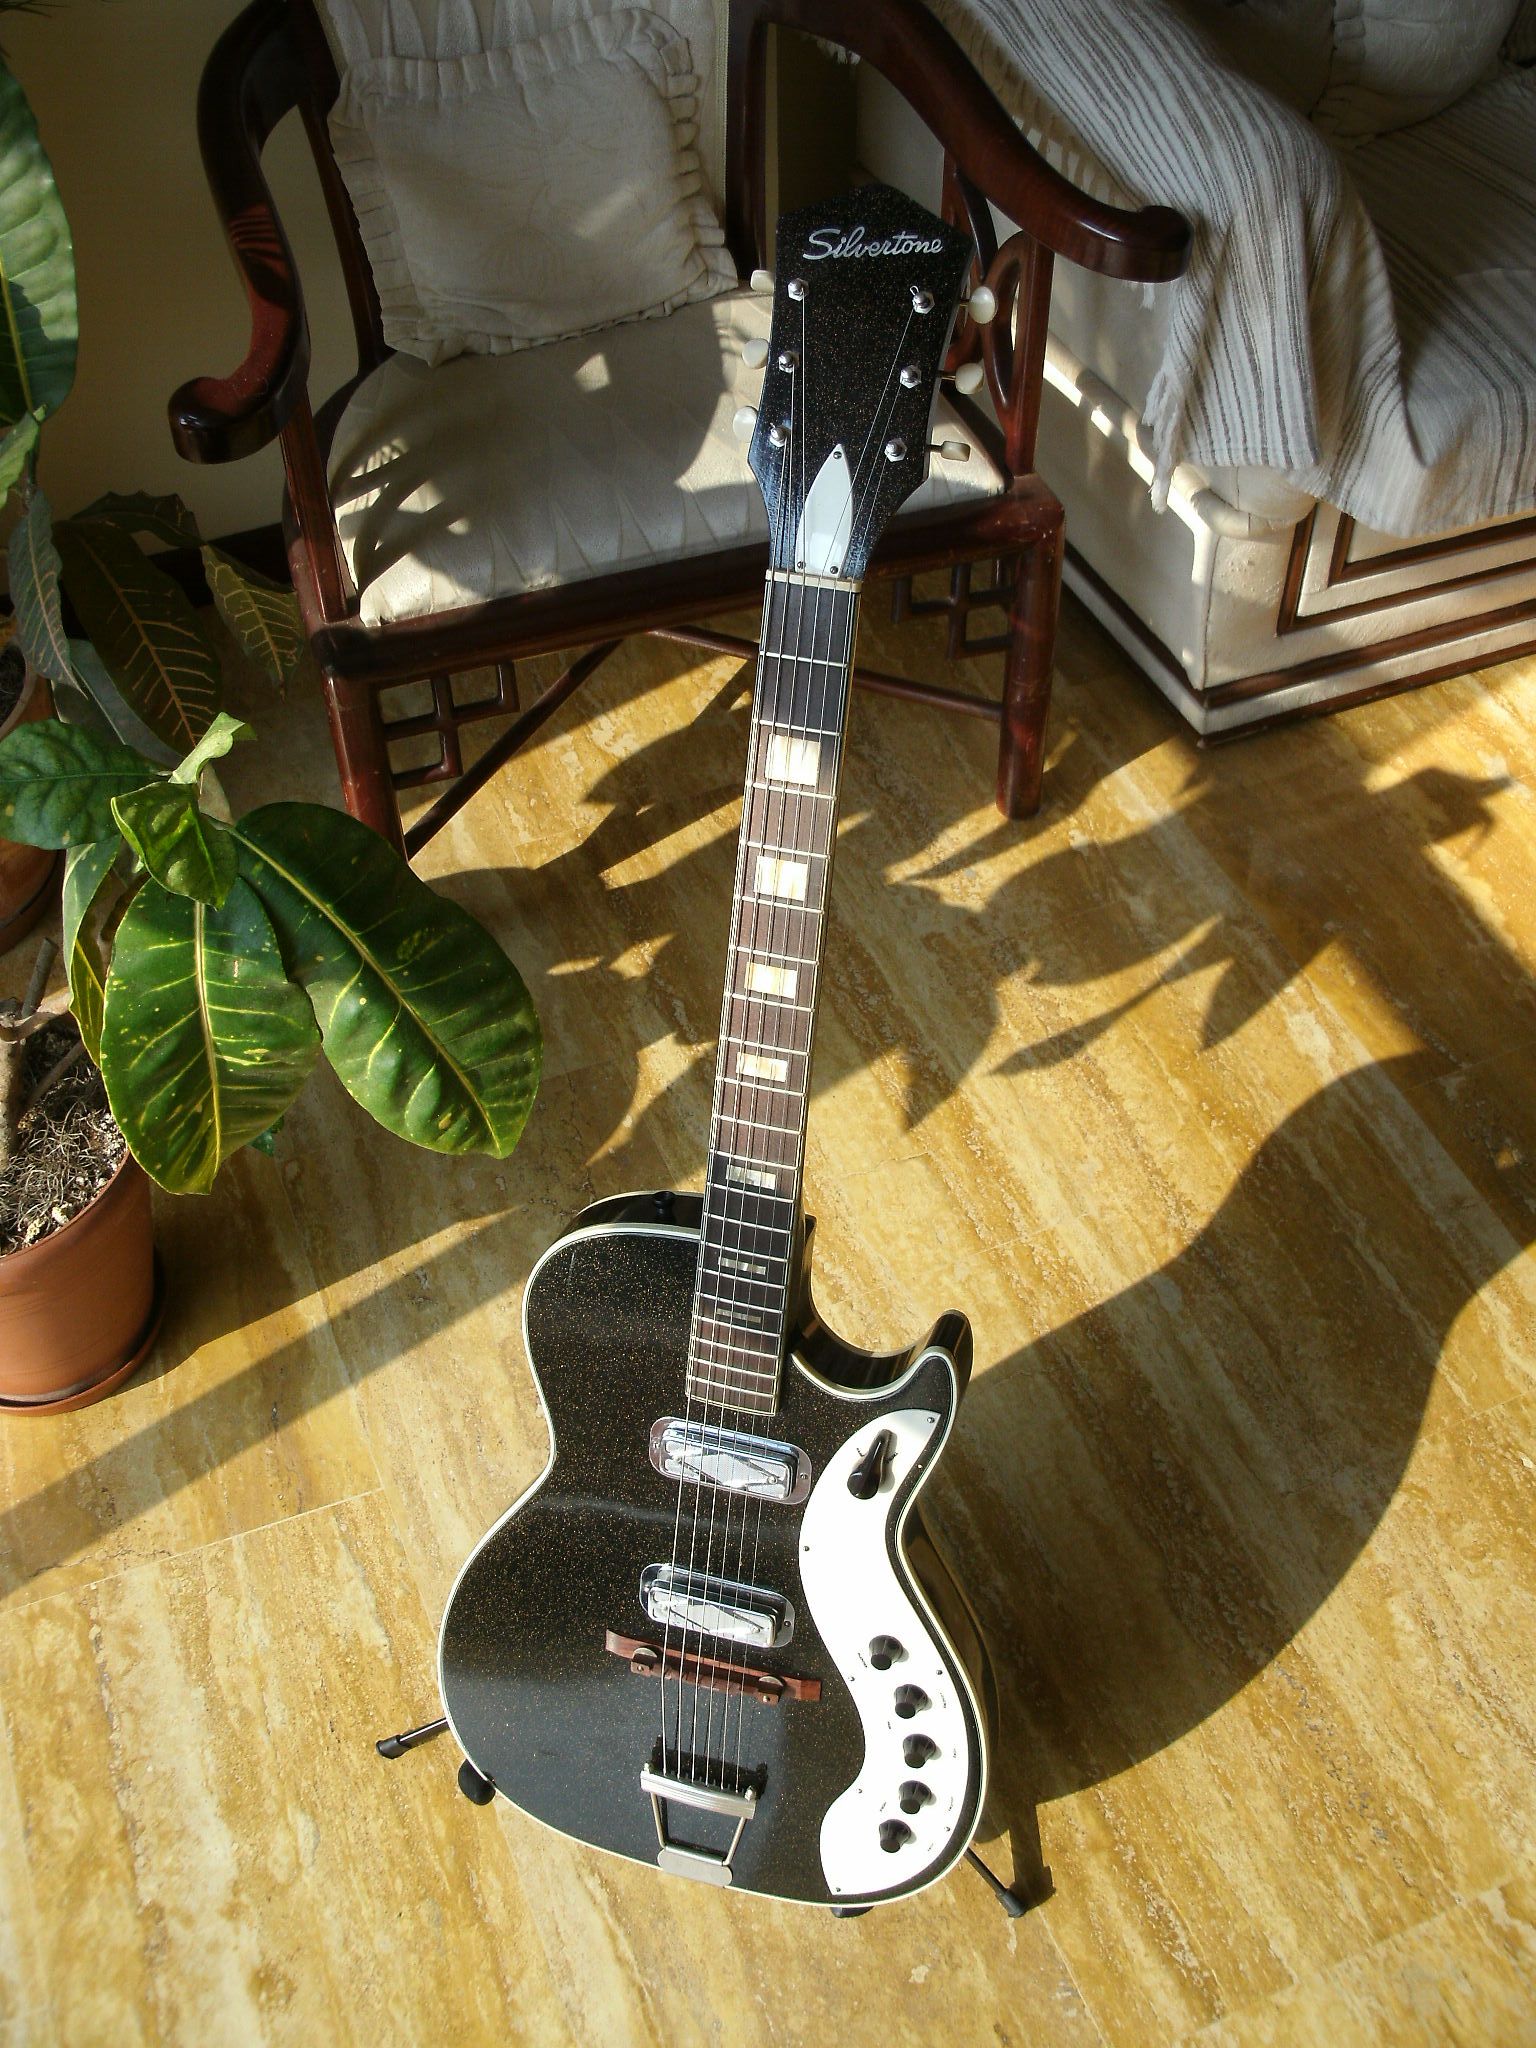
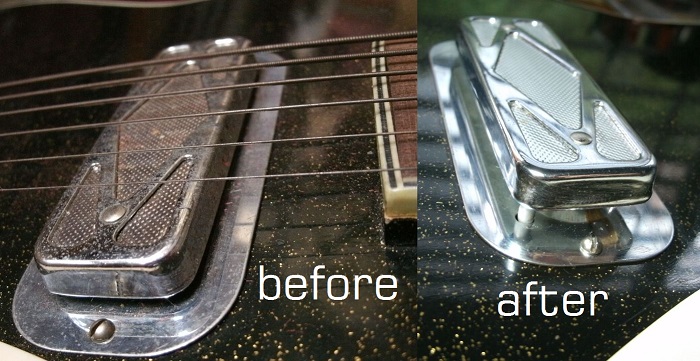
Here’s quite a finding: a semi-hollow Silvertone Jupiter 1423 guitar from 1961 with all its original accesories!
Restored Silvertone Jupiter 1423
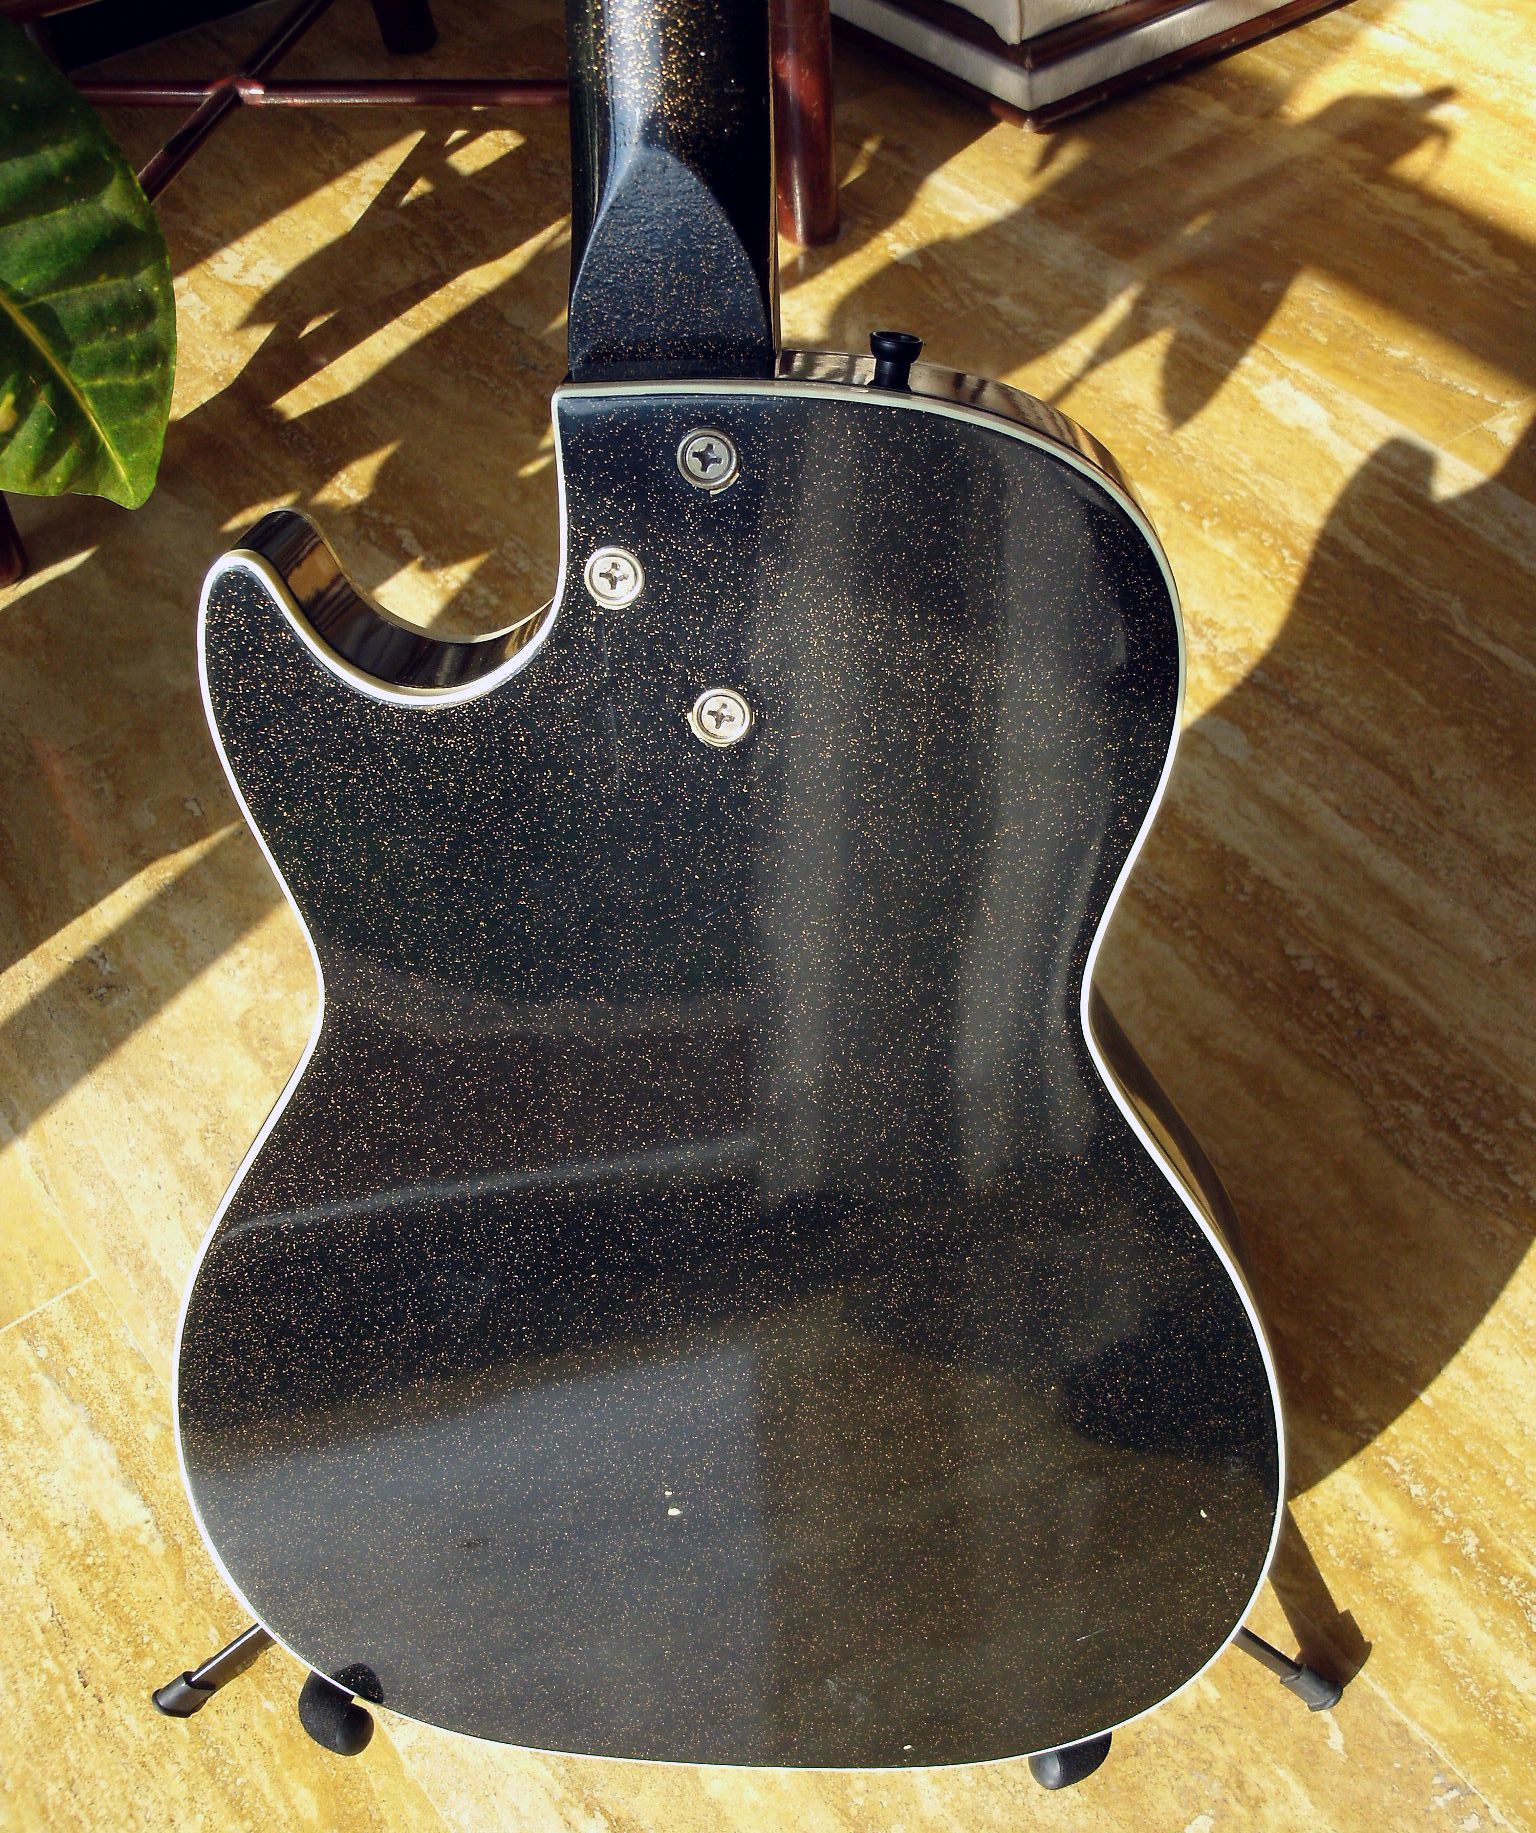
The gold sparkle over black finish is a Silvertone 1423 exclusive. Apart of some minor marks on the back, it’s a very well-preserved guitar.
Minimal marks on the back
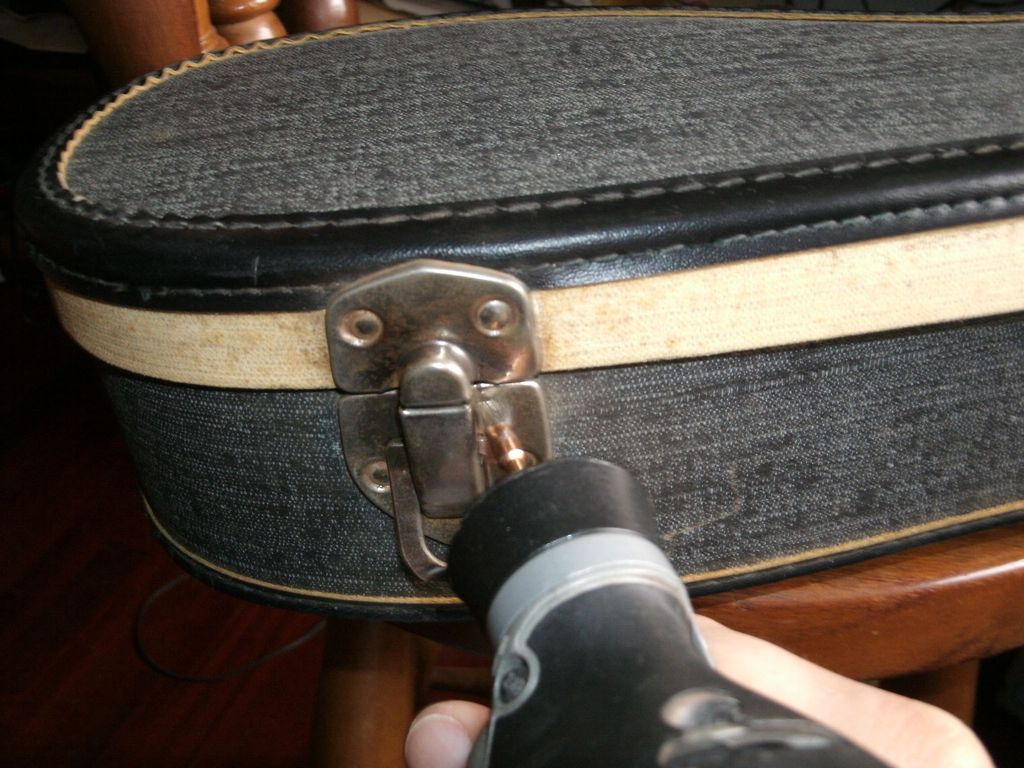
The original chipboard case is in very good condition, with just some spot marks due to humidity. It’s still structurally sound, the internal cloth remains intact, and even the external leather piece is still in good shape. All I had to do was to clean it carefully and remove the superficial rust.
Removing rust from the latches.
The fretboard and its binding were separated due to low humidity. The wooden bridge was broken, also because of the dry environment it was living in. But the finished surfaces were very good, especially taking into account its 55 years of age.
As if it weren’t enough, inside the case were the original cable that came with the guitar, the user’s manual, a detailed explanation of the 1423’s unique circuit (in a typewrited carbon-copy!), and even the sales receipt to the original owner. Amazing!
GE DIGITAL CAMERA
It’s very difficult to find an early ’60s guitar in such a good shape, but to get it with so much documentation and accesories is the rarest event ever!
Although there is no serial number anywhere, there are a couple of clues that allow me to positively date this as a late 1961 guitar.
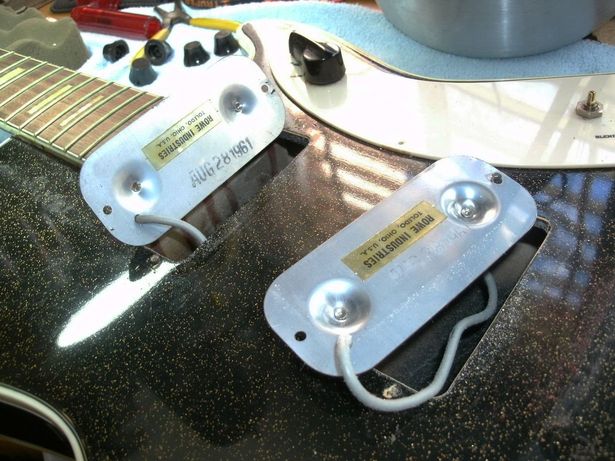
One of the documents sports the words “SEARS TELEGRAM – DIAMOND JUBILEE”. Silvertone guitars were sold through the entire USA via the Sears catalogue, and its Diamond Jubilee (75 years) happened in 1961. Additionally, the pickups have an inked seal with the day of their construction.
The original pickups were in perfect condition. A rusty, used one can be found at $120. A few years ago, DeArmond built a limited run of only 12 sets… sold at $400 each!
To get an idea of its age, let’s remember what was happening in 1961:
– In April 12th, 1961 Yuri Gagarin was the first man in space.
– In August 13th, 1961 the Berlin Wall gets built.
– “Stand By Me”, sung by Ben E. King, became a classic.
– The Beatles were still an unknown bar band!
What makes this an extraordinary finding is that Silvertone guitars were cheap instruments targeted to students. Due to this fact, these guitars were mistreated and neglected once their owners bought a fancier one. It seems the original owner of this 1423 never played it, since its frets have no wear and the wood shows no sweat marks. Even the pickguard shows no scratches!
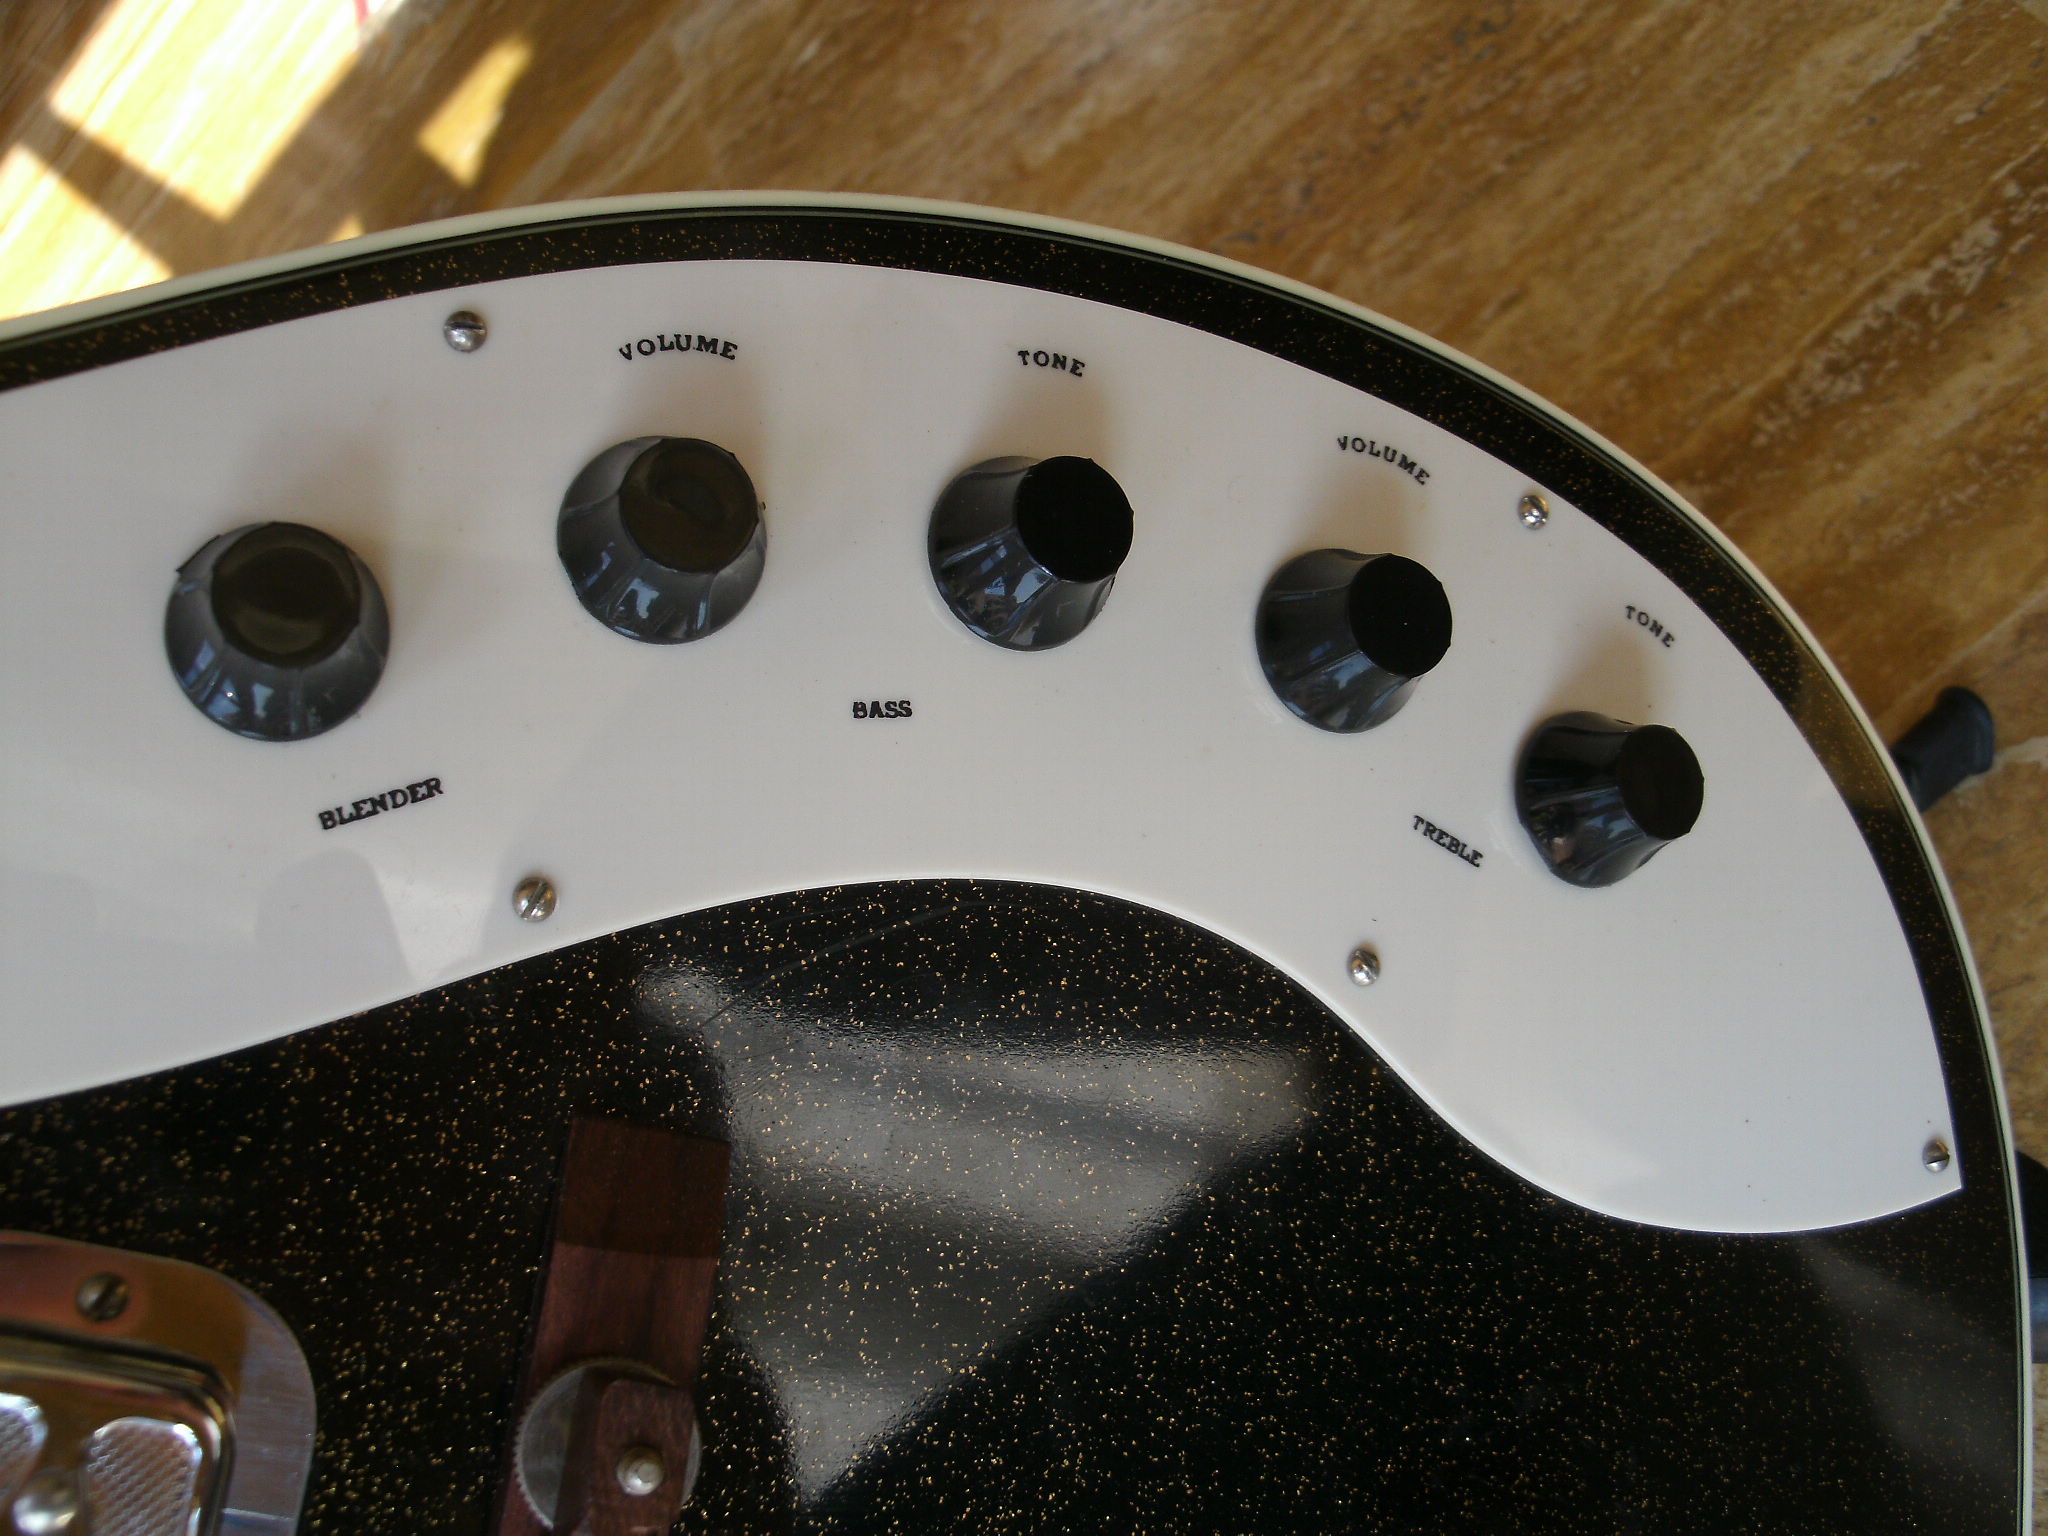
The “blender” control is unique to this guitar.
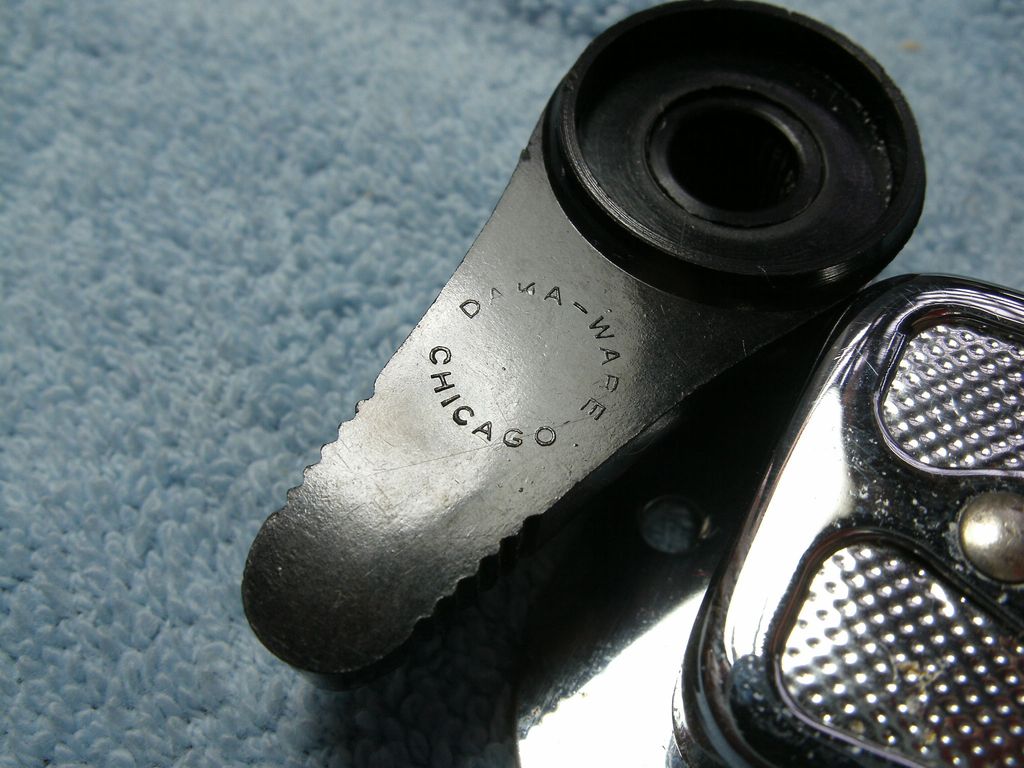
Even the knobs have a history. Daka-Ware was a trade name for compression-molded knobs, handles, and ashtrays made by Davies Molding, L.L.C. Again, “vintage” can’t get more authentic than this!
When was the last time you saw a control knob made in Chicago?
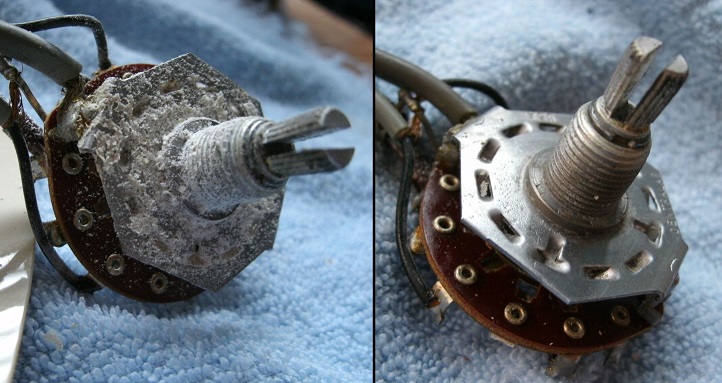
The electronics were covered with some nasty stuff all over them, but after a carefully cleaning they worked again flawlessly.
It really looks like salt.
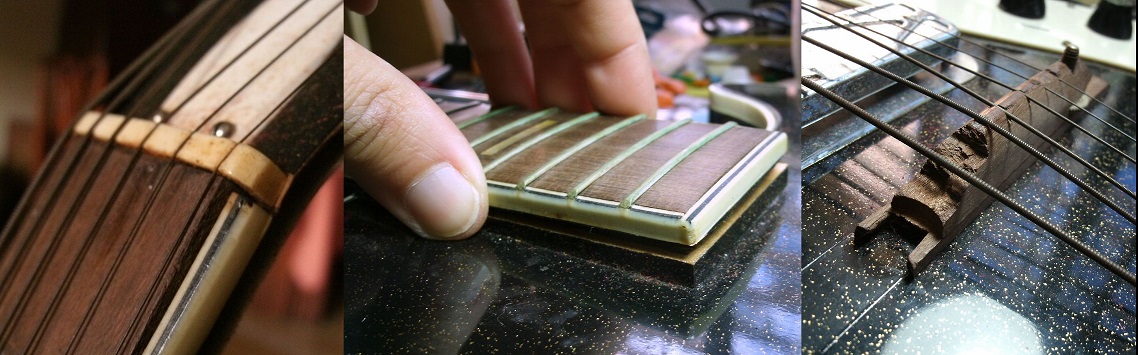
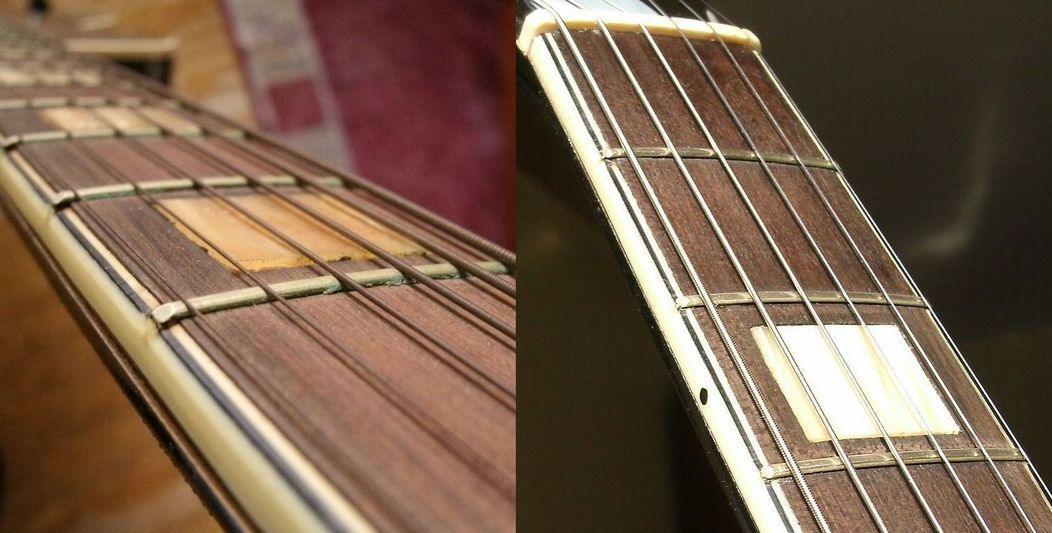
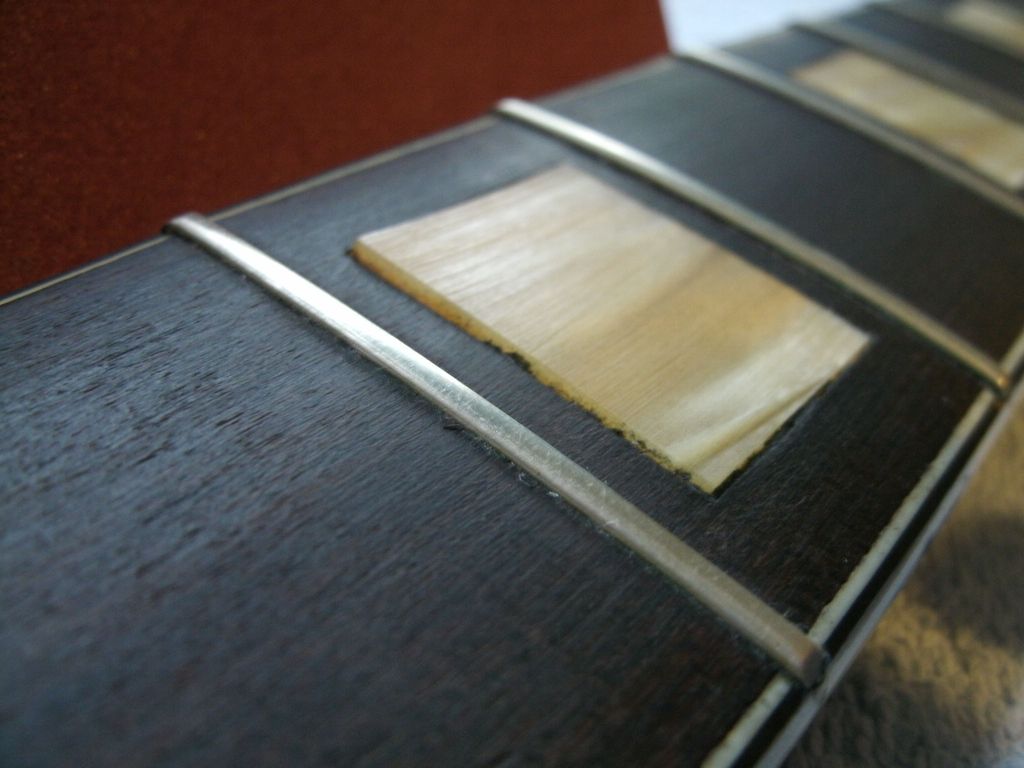
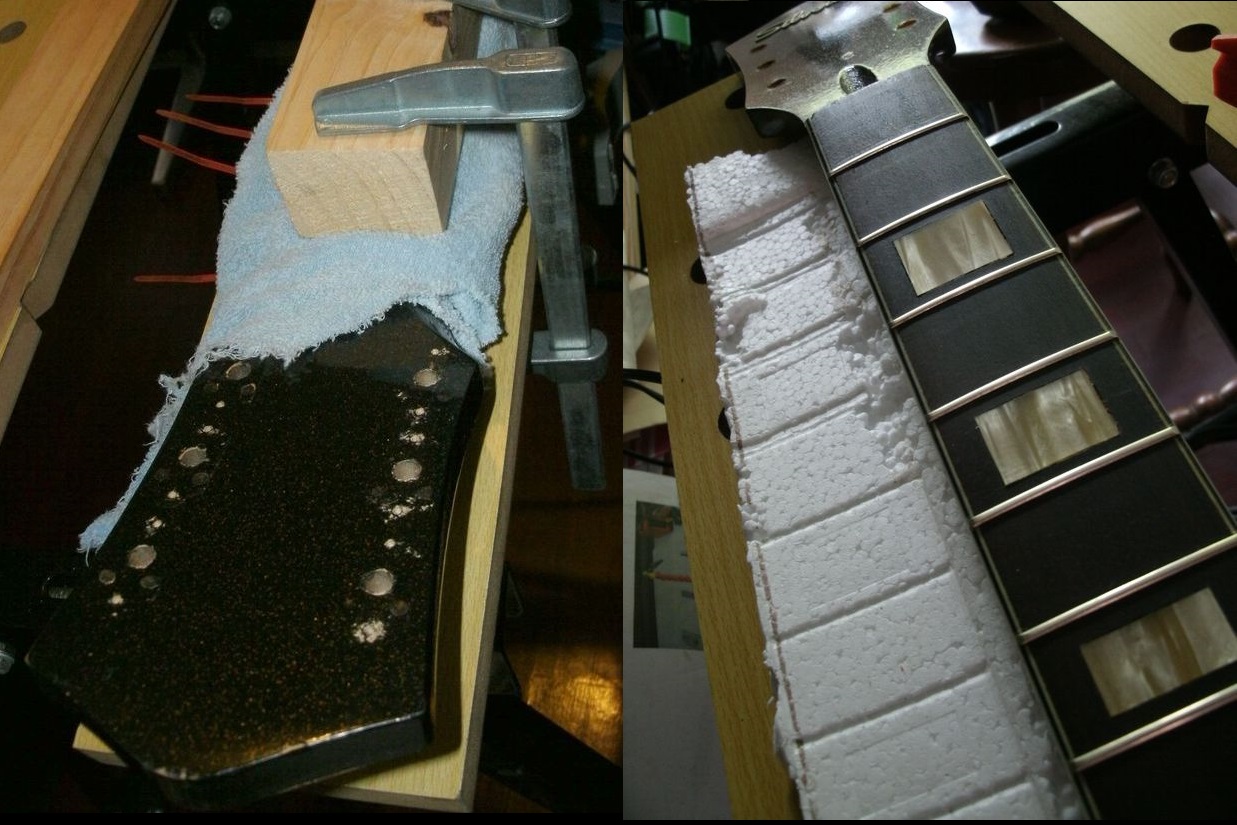
The fretboard was the most problematic part. Its edges were already separated from the neck, as the binding was. And the mother of pearl block was almost falling off its place.
It might as well jump -JUMP!- off the fretboard.
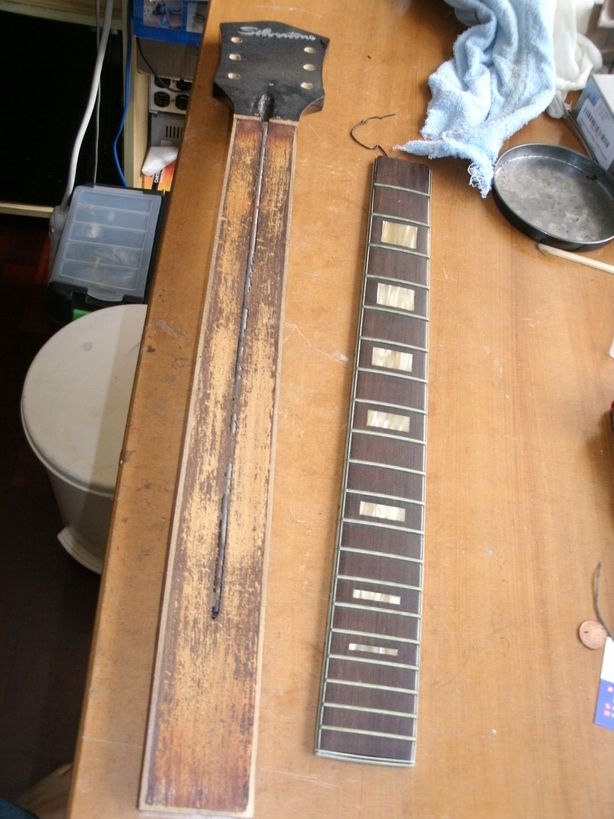
The fretboard came out easily. The glue was so shot I didn’t had to warm it up.
The very simple truss rod. As vintage as it gets.
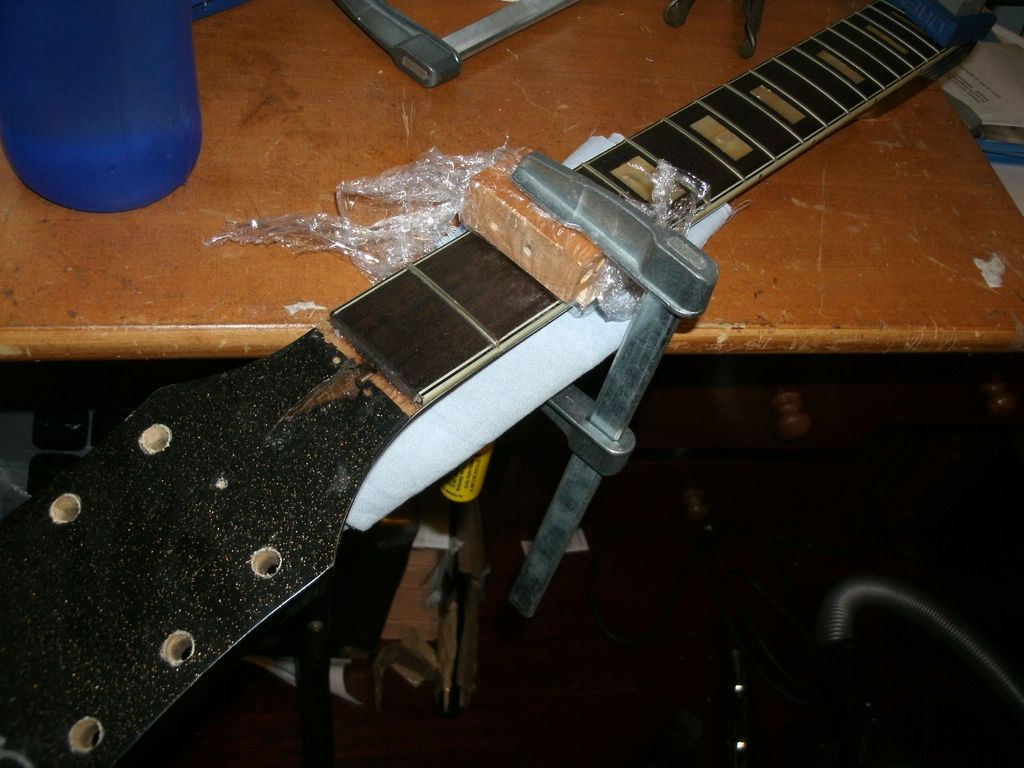
I used an unique method for gluing the fretboard back. I took a piece of expanded polystyrene foam (EPS) to even out the pressure along the entire fretboard. It adapts itself to the curved shape of the wood and over the frets, and its effectiveness can be seen after unclamping everything: the EPS shows a “negative” imprint of the surface.
Left: the EPS is between the neck and the table during the gluing procedure. Right: the EPS adapts itself to the shape of the fretboard.
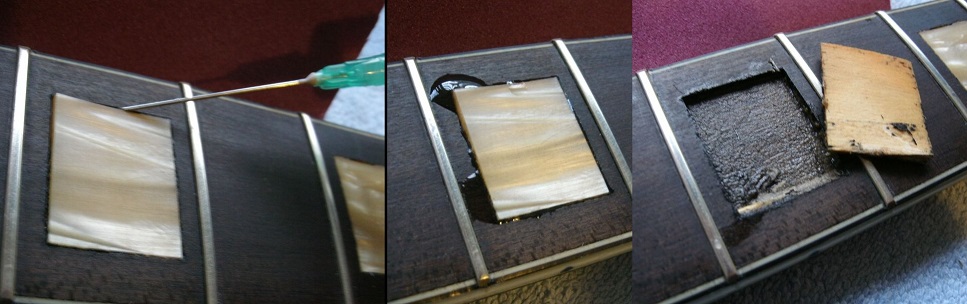
To repair the inlay, I first had to use a syringe to insert hot water under the block. Easy, right? Not when you can break a mother-of-pearl piece that’s 55 years old! And there’s always a place for surprises…
As you can see, the inlay is glued to a thin wooden laminate. If someone tries to extract the block carelessly, the mother-of-pearl could be separated from its wooden base… and that base is what keeps the shape of the inlay.
The mother-of-pearl comes as a flat piece, but the fretboard shape is curved. The mother-of-pearl was carefully pressed against that maple shim to give it the desired curved shape. When the glue failed (as it did on the rest of the fretboard), the mother-of-pearl piece simply returned to its original flat shape. That’s why it looked like it was raised along the edges.
The repair required to slightly heat the mother-of-pearl to soften and have it bent again while keeping the maple shim underneath, and then glue it all together in its original place using a wooden piece shaped to the same curvature of the fretboard. All this has to be done quickly enough to avoid it to cool -and thus, to become rigid again- before I can get it in its correct place with the desired shape.
The clear wrapping foil is to avoid excess glue to creep between the top of the inlay and the curved wooden block.
The last step was to clean and buff the frets to a mirror-like shine.
The bridge was a difficult decision. Since I assumed the owner wanted to play this guitar, I decided not to create an exact copy of the original Silvertone bridge because that design has two inherent defects. First, the outer edges break apart very easily (as it already happened on this guitar). Second, the parabollic shape of its top don’t offer enough material to perform a correct string length compensation. That’s why I created a wooden stepped bridge similar to the ones used in the ’50s era Gibson ES 175. I used the original wheels and hardware. It doesn’t look original, but it is period-correct and much more durable.
These days, the Samick factory is building modern replicas of Silvertone guitars with a much higher quality. However, the new 1423 doesn’t sound like the old ones for a few reasons:
1) The original pickups were DeArmond “Silver Foil”, but current ones are “Duncan Designed” pickups, very similar to the Gretsch Filter’Tron.
2) The current bridge is a metal “Tune-O-Matic” bridge. The original one is a wooden one.
3) The body woods are also different. The “Silvertone-by-Samick” guitars are all-mahogany, while the original ones had maple sides with spruce top & back.
As a result, the newer ones sound like a Gibson ES-335 or an Epiphone Casino. Not bad at all, but players who prefer the unique tone of the Silvertone 1423 are still hunting for the vintage ones. And I think you can’t get more vintage than this!
Even the plastic strap buttons are immaculate.
The current owner brought this guitar to me to fix it and give it to a youngster who is learning to play guitar. After explaining him the value of this instrument, he told me he’s gonna show it in a special place in his living room and buy a cheaper one for his kid!
If you have a vintage intrument you can show it as a museum piece, but it is important to play it once in a while to avoid the damages caused by neglect. This Silvertone is finally ready to rock any stage or amaze any recording enthusiast. And I can tell you this guitar sings beautifully. As a goodbye, I leave you with this video, which was made with another 1423:
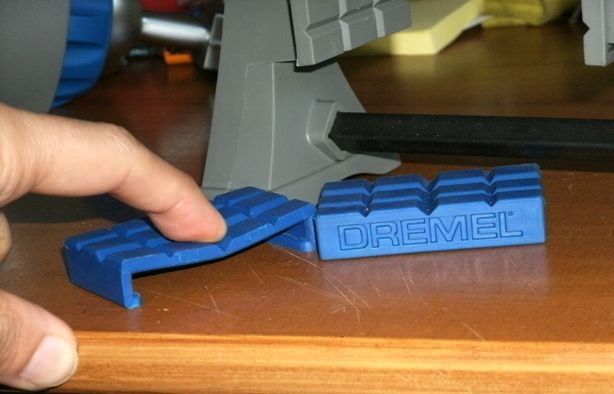
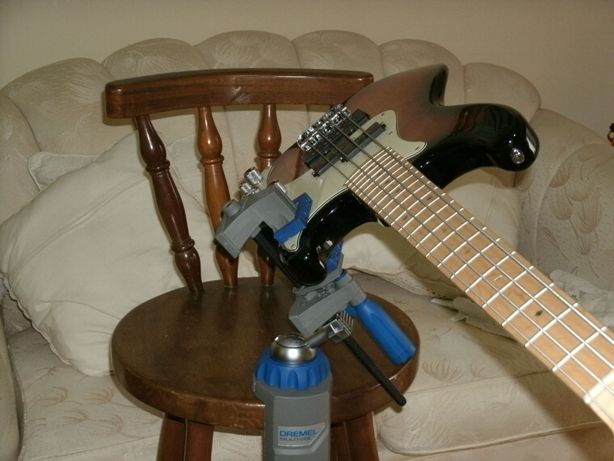
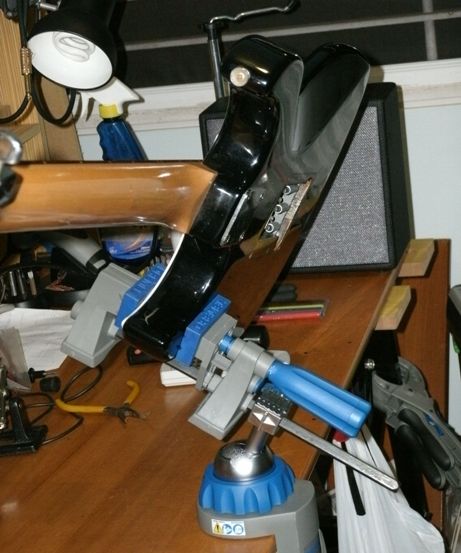
Let me introduce you this fine tool by the guys of Dremel: the Multi-Vise.
It might look just like a plastic vise with a ball-joint base. But as with any other Dremel product, it offers an edge above the competition. It’s built with ABS plastic, to make it lighter and less expensive than the usual cast iron. However, it’s very tough, as I have found out these years.
Let’s start with the fact that it is a modular system: you can use the vise on its own, without the ball-jointed base.
A common design language for all Dremel products are the color-coded parts. Grey ones are structural, black ones are for increased grip, and the blue ones are the parts you have to manipulate. That leads us to the most prominent feature of the Multi-Vise: The jaws have removable cushions made out of some elastomeric polymer.These cushions are extremely soft to the touch, to avoid scratching the surfaces you’re working with. After four years using it, I can say they don’t cause any chemical degradation to lacquer, oil, or shellac finishes.
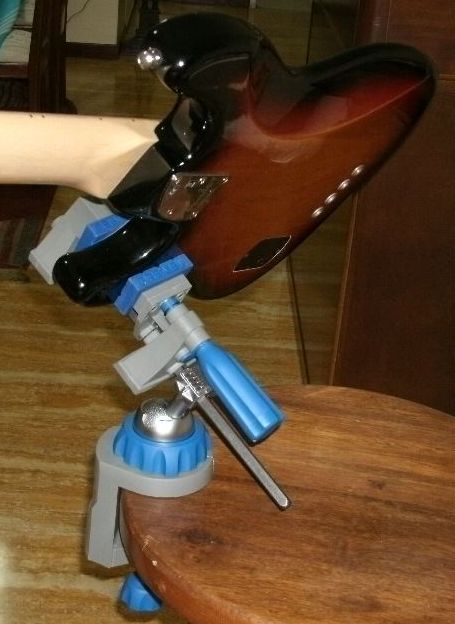
Another outstanding feature is the high-grip black rubber foot on the base. This allows you to have a secure mounting without too much tightening of the bottom screw. In the picture you can see a flat longitudinal section on the side of the screw. This allows us to use a 5/8″ wrench when tightening (or loosening) the mounting screw when needed. I’ve never used it, but it’s nice to know it’s there.
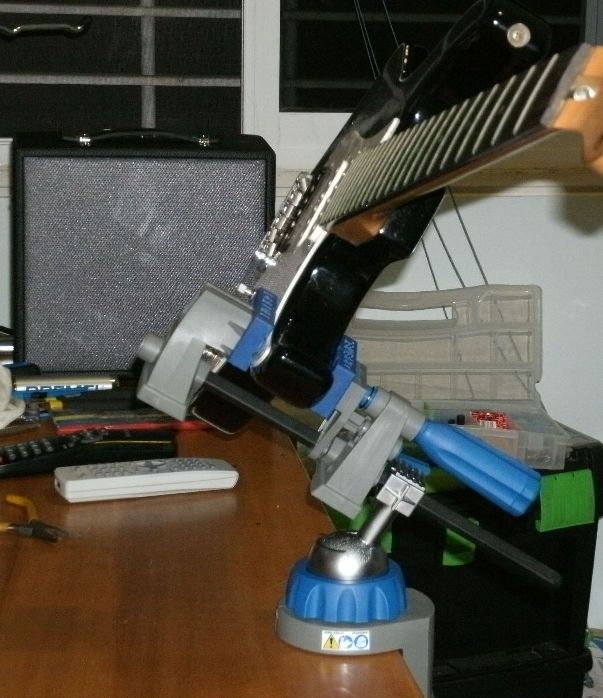
The gripping power of this vise is so huge it can hold a heavy electric bass without breaking a sweat, and with no scratches! All you need to mind is to grab the guitar near its center of gravity, to keep it stable.
This tool allows me to do an instrument’s setup in playing position, no matter how awkward it might be, with complete confidence. It simply won’t fall!
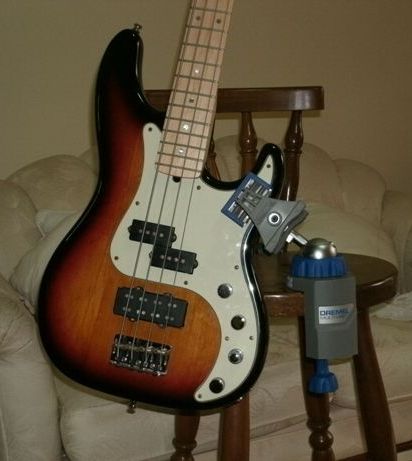
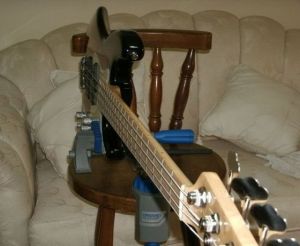
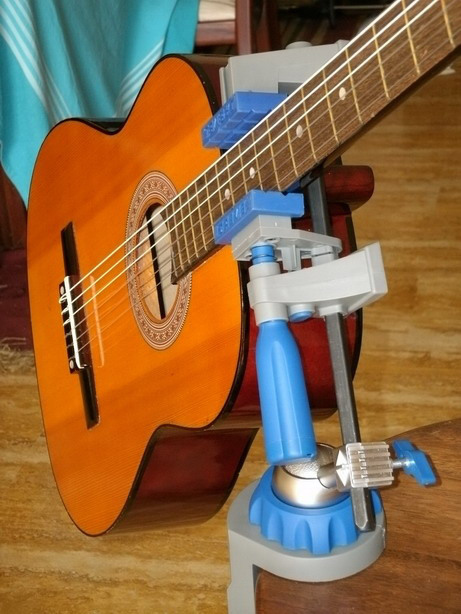
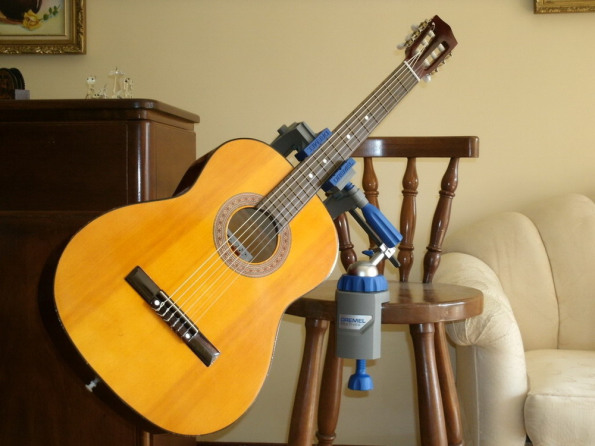
When working with acoustic instruments, it’s better to grab them by the neck instead of the body… to avoid crushing the soundboard!
In this position, I’m still able to do a setup in playing position since the jaws don’t touch the strings. Not only the guitar can be played this way, but it will sing naturally since there’s nothing touching its body.
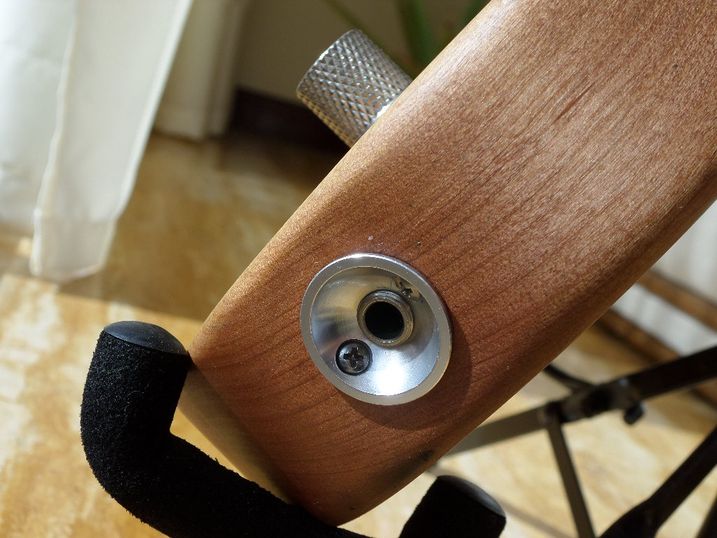
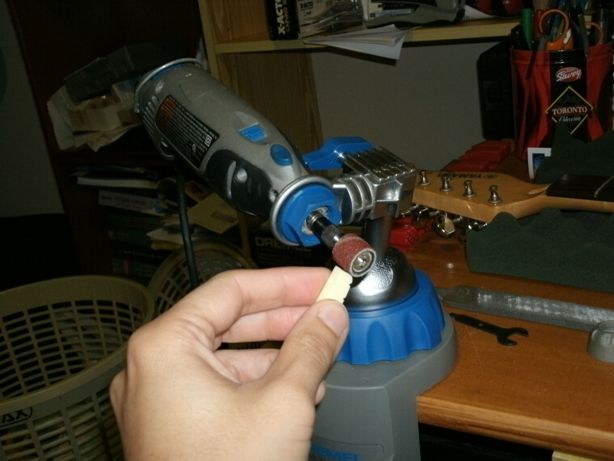
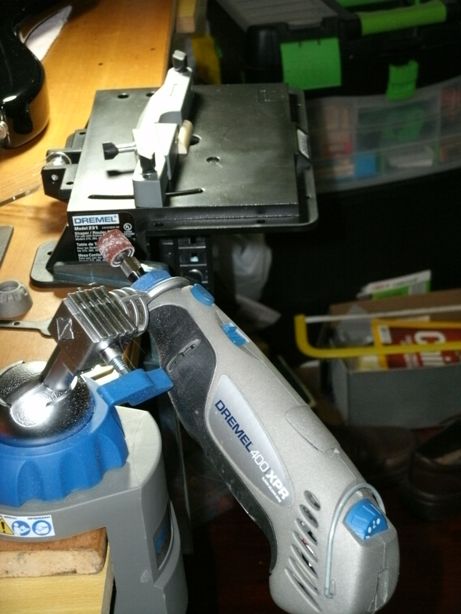
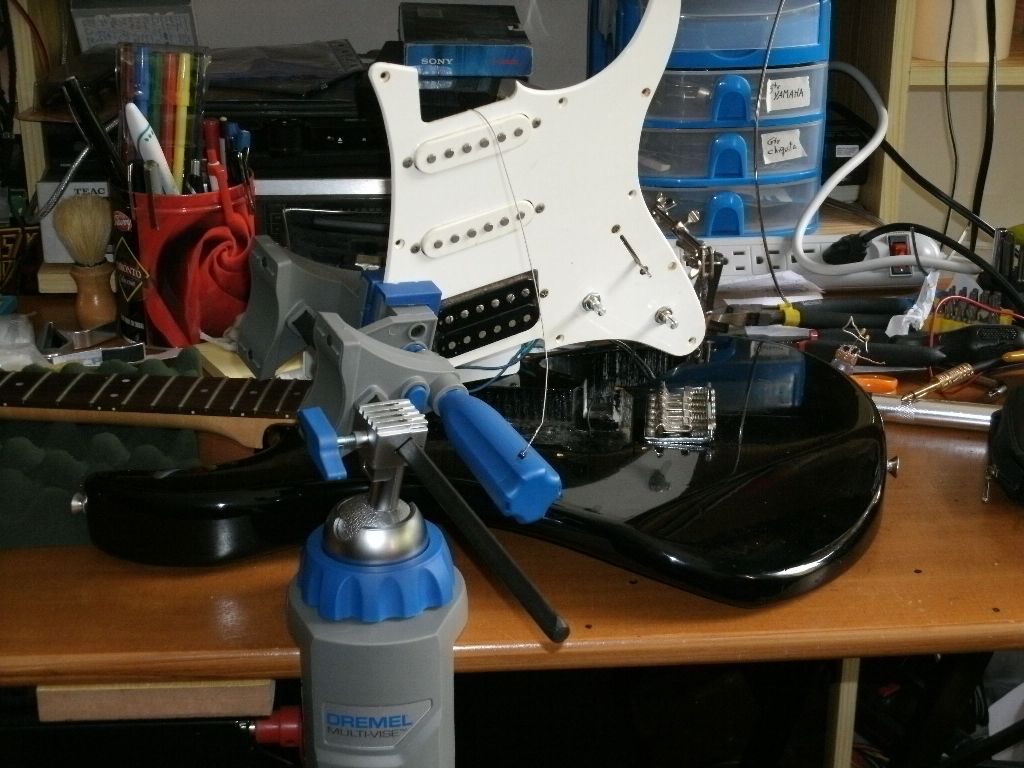
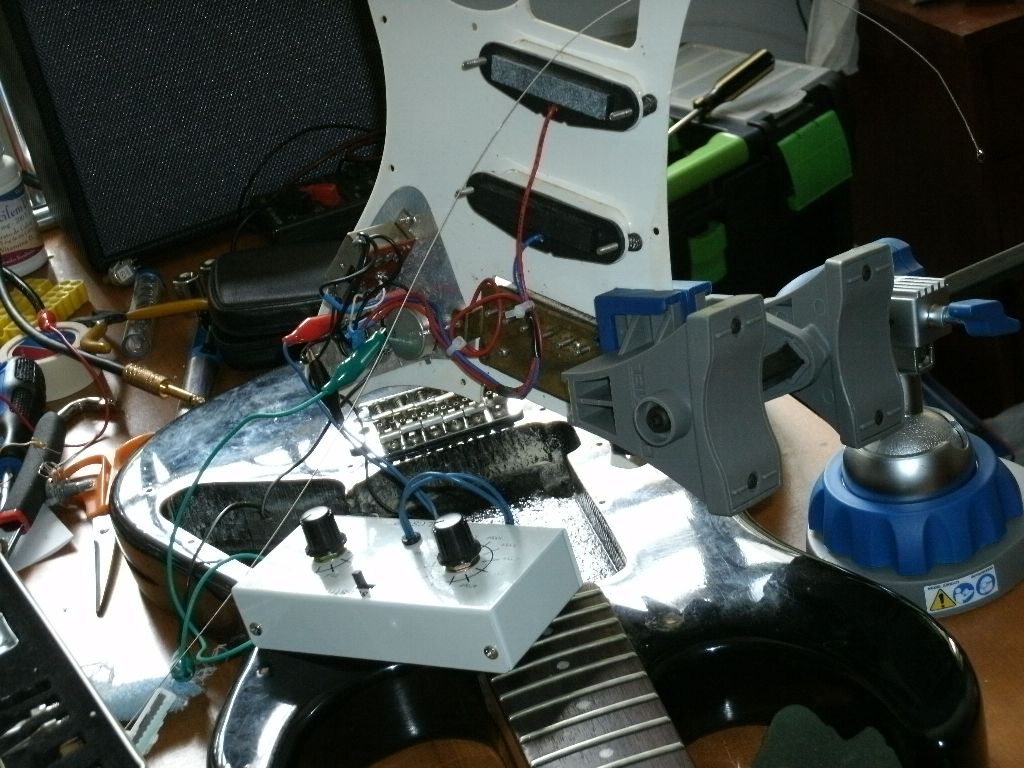
The ball-joint base also allows you to hold a Dremel rotary tool “in the air”. I often use it for carving and polishing a bone guitar nut to size. It’s always easier to handle a small piece around the tool with precision than to control a power tool around a small object. After shaping the bone nut, I cut its bottom to size with the Dremel 321 routing table (seen in the top of the next picture)The multi-Vise is wonderful when working with guitar electronics. I just hold the instrument’s pickguard over the guitar while checking everything. It just couldn’t be easier!
In these pictures I’m doing a tone-control adjustment. Passive tone controls rely on capacitors to filter higher frequencies, so I use a variable capacitor (the grey box with knobs) to test the sound before altering the stock circuit. By holding the electronics over the guitar with the Multi-Vise, I can do everything I need without disconnecting anything.
Once the innards are done, I have to string it up and perform the final setup. However, guitars with tremolo bridges require to equalize the tension of the strings against the tension of the bridge springs mounted at the rear. That means working on the front and on the back of the guitar at once! Usually, the work would be like this:
adjust the strings / flip the guitar /
adjust the springs / flip the guitar /
check strings / flip the guitar /
readjust the springs / flip the guitar/
check the strings / flip the guitar /
With the Multi-vise, I just place the guitar in playing position and work on each side effortlessly. There’s simply no better way to do this job!
As with most Dremel products, it can be said that there are other tools that can do these jobs. However, there’s just no other product that can do all of these, with this versatility, without scratching your work, for this price. Period.
After writing this I think it might look like an infomercial, but it’s the honest truth. I’m neither related nor working for Dremel on any of its affiliates (though I wouldn’t mind to!). It’s just not common to find such a well thought out product like this. The Multi-Vise shows Dremel really listens to their customers requests and work to please them.
Action is the amount of effort a musician has to exert over the strings in order to make them ring clearly. Lower action is preferred by most advanced players because allows for less fatigue, easier fingering, faster runs and better intonation. Plus, once the action has been lowered, it’s fairly easy to raise it. However, the opposite is not usually true.
One of my trademarks has always been the quest for lower action. Altough some players prefer it to be higher, I have seen how once my clients try their instruments with a lower action, they ask me to adjust their other guitars as well!
Let’s revisit once again the infamous red bass guitar. Its bridge had to be shifted from its original place because the screws were far beyond the rust. When I strung the bass up, I adjusted the saddles to their minimum height. Usually, this forces the strings against the frets, buit this was not that case.
As you can see, the strings were very high, almost like an upright bass. No one in his mind would give this torture device to a novice player!
Usually, a neck reset could take care of the problem, but the screws were extremely tight, and since this bass had a story with broken screws, I opted to leave them alone. So I turned to the bridge instead.
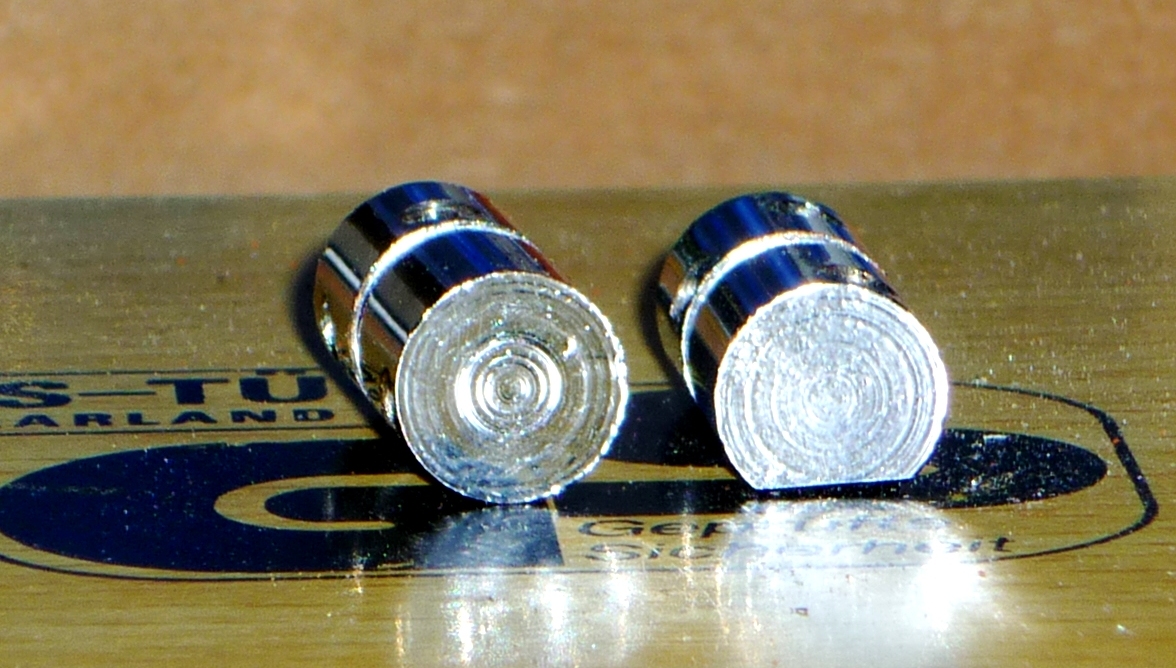
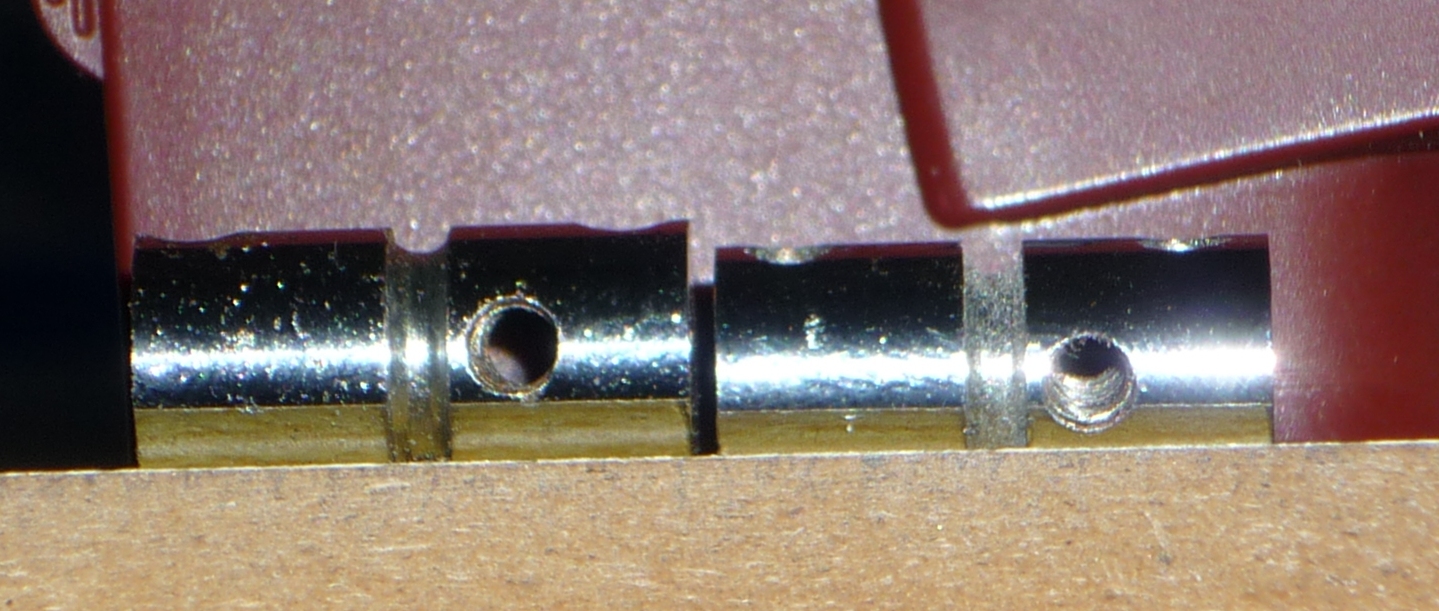
The modifications I did were focused in the saddles and the body. First, I truncated the bottom part of the saddles. Then I deepened the string slot inside them, but even that wasn’t enough. Look at the pictures to see the difference.
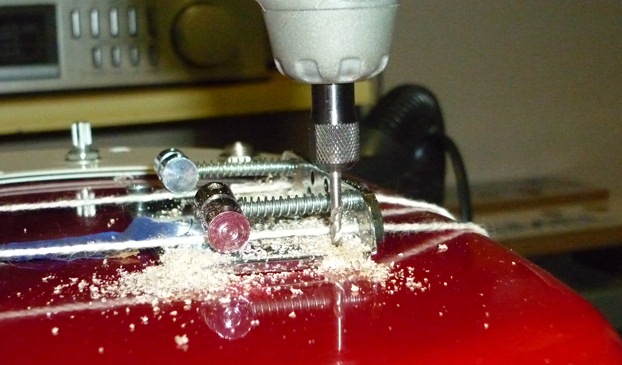
I decided to carve a place to install the bridge inside the body instead of on its surface. This way the baseplate would be flush to the body and I could get the entire bridge 1/16″ lower to aid in the process. I used the Dremel 335 routing attachment with the #115 tool to leave a smooth surface on the bottom.
Look how I am using goggles and a dust mask. Most people seem to not be aware that inhaling dust can lead to respiratory diseases. And if, as in this picture, the dust has chemicals from the finish, the damage can be serious. Safety first, folks!
With these modifications, I was able to get the string much lower than before. In the picture at the bottom you can see how the bridge plate sits flush with the body, and how lower is the first string when compared to the unmodified saddles.
In the end, I managed to get the action much closer than before, and the kid was able to play his first bass easily.
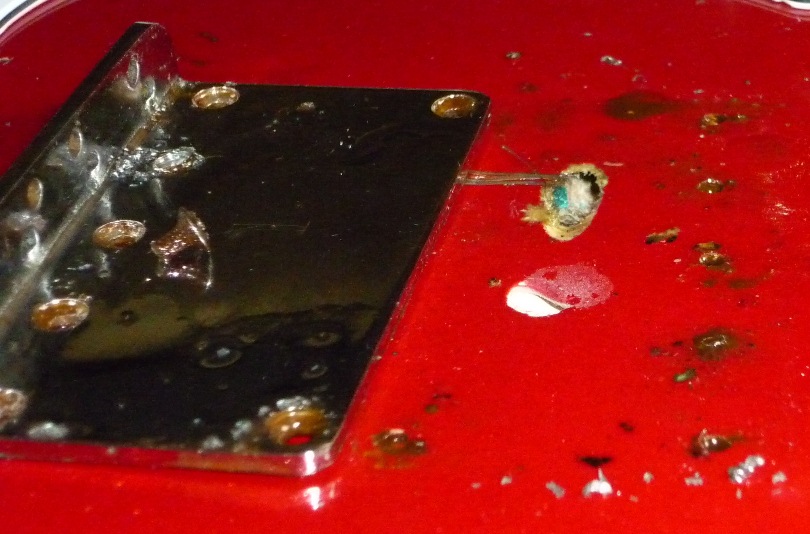
Here is an epic repair work. It’s a very simple story: its owner has had the bass stored somewhere and decided to give it as a gift to his niece. Nothing fancy at all…
… except it was EXTREMELY RUSTY!!
Every single screw was so corroded I couldn’t get them out without breaking their heads. I tried all my extraction techniques unsuccessfully.
Since all the pickguard screws were broken, I opted to reinstall the pickguard 4mm closer to the bridge so I could use new ones without messing with the corroded remnants of the originals. Yes, the correct procedure would have been to extract the original, set in a dowel, level and refinish the body. But that would have cost more than the entire bass, so I chose to do a less expensive work.
Since the pickguard screws were so corroded, I inspected the entire bass. Well, EVERY SINGLE SCREW was completely busted. The ones that hold the neck, the bridge, and even the the strap button screws: all were rusted beyond repair. All this stuff was really dangerous, I was afraid to use the strap fearing the strap button screw could break their heads off! Even the upper horn strap button collapsed when I tried to unscrew it carefully by hand: go figure!
So, I decided to repeat the procedure described above and install new screws beside the old ones everywhere. Eventually this led to a repositioned pickguard AND bridge.
Yes, even the bridge screws lost their heads due to corrosion. The picture shows how I drilled new pilot holes right beside the remnants of the old screws.
Look at the screw head over the bridge plate.
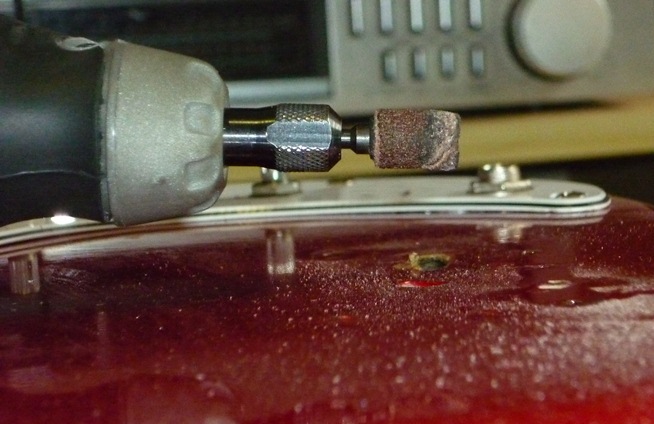
To file off the “stump” of the old screws I used a Dremel 431 sanding drum with a 60-grit value. Why not a cutting wheel? Because the screw was so rusted the wheel just threw fragments everywhere! By using a sanding drum I was able to slowly grind the screw remnants out of my way.
As you can see, what was a simple setup work ended up being a much expensive one just because I needed more time to cope with all that rust… just because he left the instrument unattended during years. The moral of the story? KEEP YOUR STUFF CLEAN!
And there are even more corrosive stories about this bass… right here!
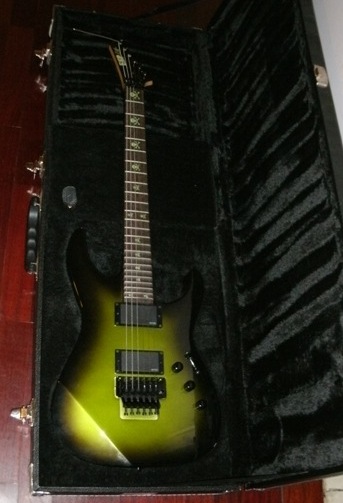
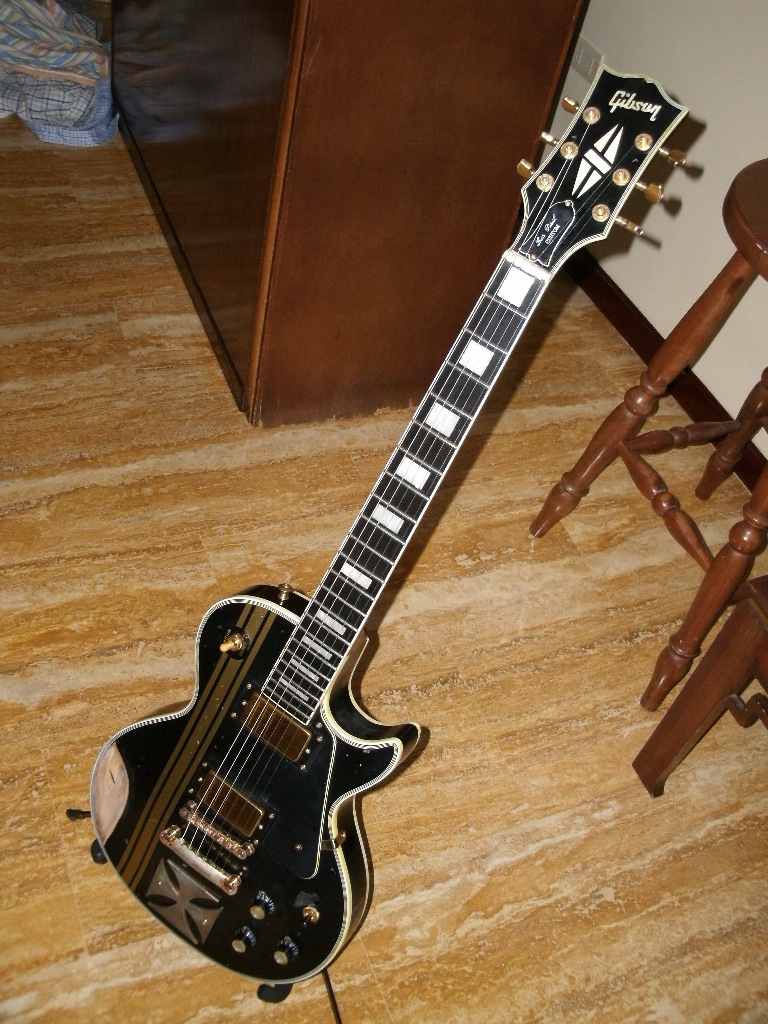
… well, kind of. It’s just that a few weeks after having the Gibson Les Paul Iron Cross (a James Hetfield’s guitar replica), I had its partner on my workbench: the ESP Kirk Hammet! And not just anyone, but the KH-2SE; a 100-units limited-edition. ¡A real beauty!
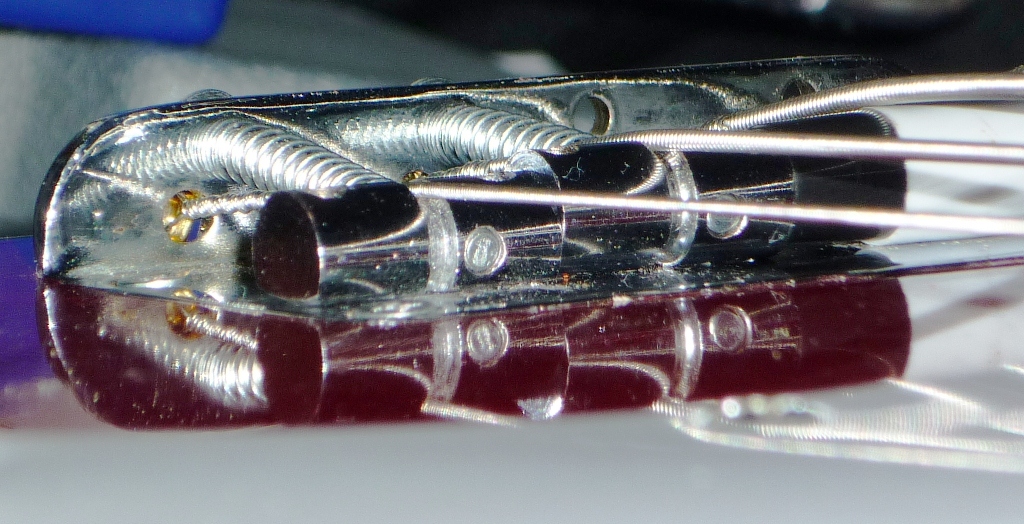
As I studied it, a phrase crossed my mind constantly: this is a tough guitar made for tough work. The ORIGINAL Floyd Rose has a thick black chrome finish, and the neck has a clear thick finish as well. (When you have to play two hours every night, sweat-induced damage is a major issue).
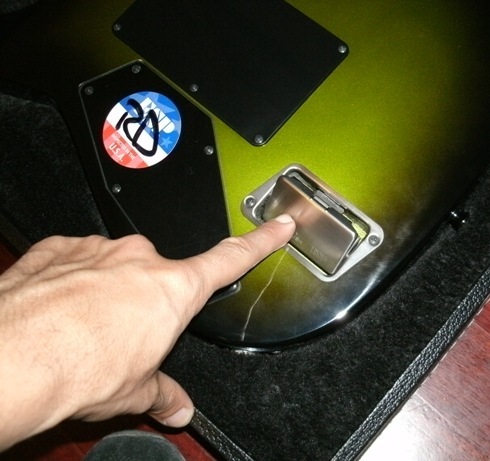
The battery box is a quick access one: you just push it on the edge and opens. This is way easier than most ones, and to make it more reliable it’s made of aluminum instead of plastic.
What I found more appealing was to compare the Kirk Hammet’s guitar with Hetfield’s. Even while being on the same band, each player have different needs and their guitars reflect that fact. James Hetfield wants a fat tone for his fast, intrincate riffs, so he opts for a fixed bridge on a heavy, all-mahogany guitar, and the fat neck profile fits larger hands comfortably; especially when doing chords with a fist-like grip.
Kirk Hammet is the polar opposite: his physique is not just leaner (he doesn’t use heavy guitars), but his work is also different. He’s often doing fast solos, with lots of bending and heavy tremolo use, and he’s moving around the stage since he doesn’t have to sing. But his rhythm playing also needs a fat tone and quick attack.
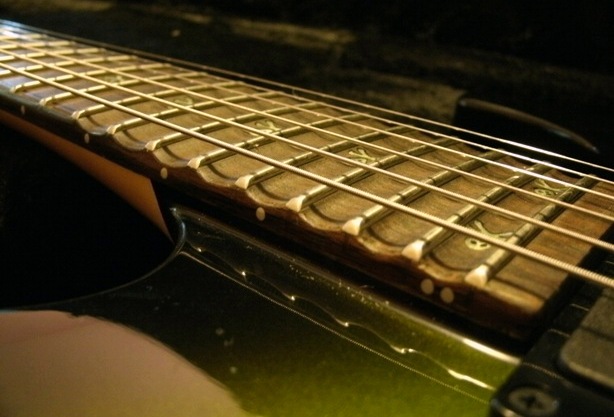
Kirk Hammet’s ESP meets his demands in different ways. The alder body gives the guitar good resonant properties while keeping it lightweight. The neck has a slim profile known to aid fast playing, and the fretboard is scalloped on the high notes for easier bending and vibrato.
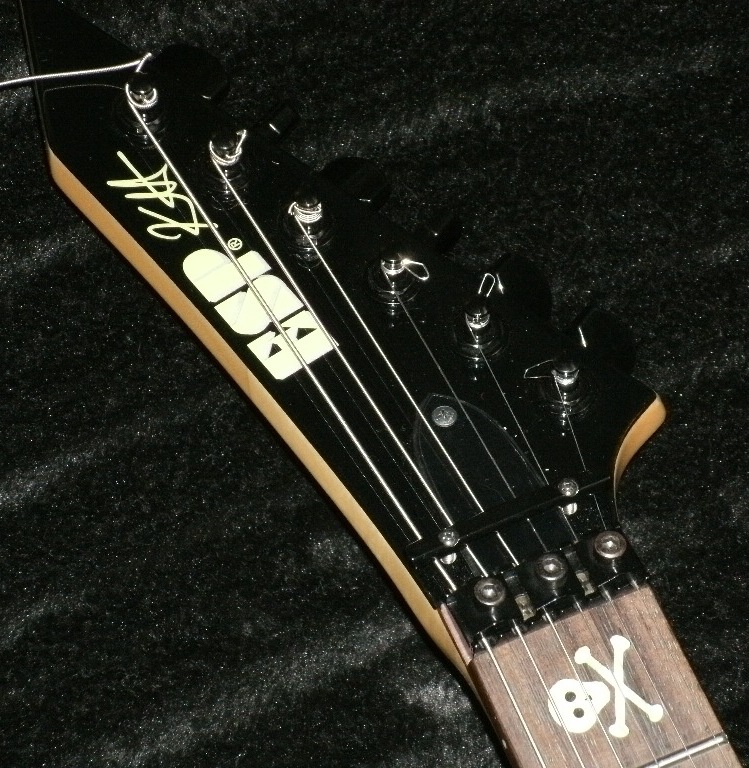
A common problem with slim necks is that they are prone to warping, specially when using non-standard tunings. To prevent this, ESP used three pieces of hard rock maple, a construction method widely known to be effective against that problem.
To keep correct tuning after a wild tremolo shaking, an original Floyd Rose has been installed. But it has an unavoidable side effect: the tone is thinner than a fixed bridge. It seems to me that most Floyd Rose guitars sound very similar just because of that.
To keep some low-end, ESP opted for a neck-through-body construction. This is a way to highlight the deep end of the sonic spectrum, a fact that can be confirmed by all those bass guitars using this construction. (Slappers prefer bolt-on basses because they drop some lows, thus enhancing treble). An additional benefit is that having no neck heel makes for a more comfortable access to the higher notes of the fretboard.
You can hear the results of this work in this short clip of Hammet doing an unaccompanied solo.
While ESP could have used a glued-on neck (as Gibson does), the glue does absorb some of the vibrations coming from the neck. That’s why you don’t see many Floyd-equipped Gibsons: the resulting tone is very thin. That can be desirable sometimes, as when playing against a thick sound coming from other guitars, keyboards or horn sections. To know how a Gibson Les Paul sounds like when having a Floyd, just hear Neal Schon Journey’s “Revelation” album and tour.
Neal Schon with his Les Paul and Les Paul with his Les Paul. (Photo: Christopher Lentz, Les Paul Foundation).
While it’s true that world-class players like Hammet, Hetfield & Schon (sounds like a law firm, doesn’t it?) can call anyone to build the guitar they want, truth is you don’t have to be a superstar to get the instrument you need. Given the vast amount and variety of models available these days in any price range, no one should trade for a less-than-adequate axe. Just ask any seasoned musician to help you through the process of choosing the right instrument for your needs, technique and desired tone. Odds are they’ll be glad to do it.
I’m just so happy to be able to work with these high-profile instruments. Now I just have to wait for Robert Trujillo’s bass guitar!
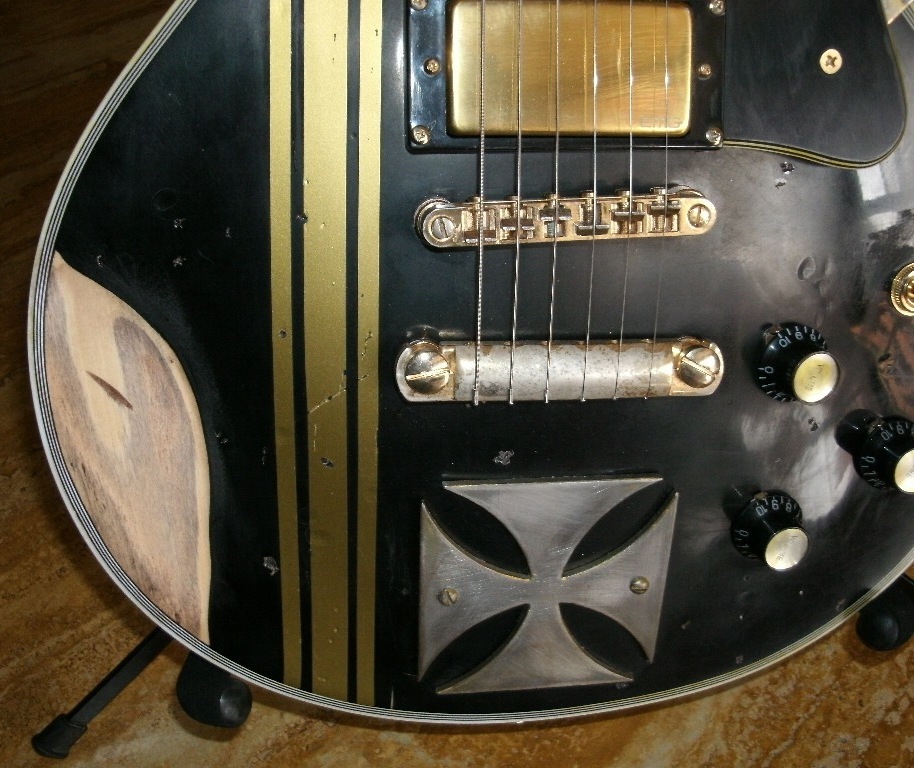
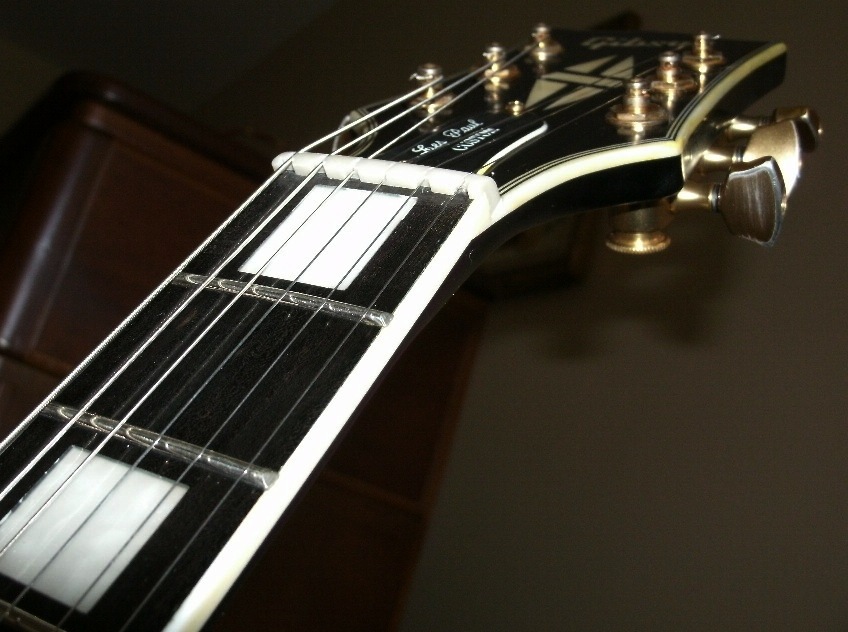
I’ve had the joy of working some remarkable guitars through the years. This time I’ll write about a Gibson* Les Paul Iron Cross, owned by Arturo Civit. This one is a close replica of one James Hetfield owns.
This replica has even the same wear of the original one!
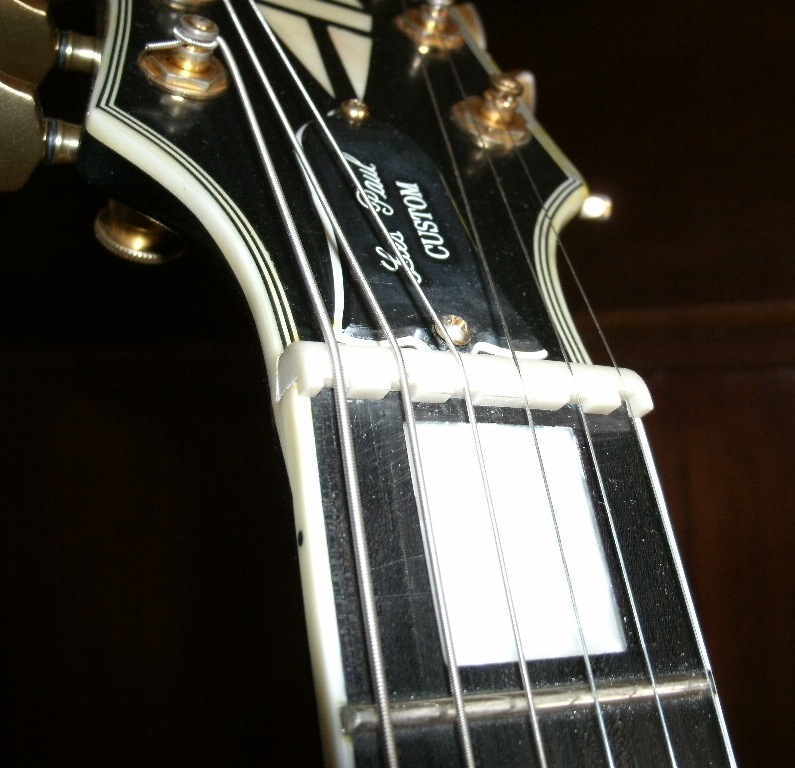
What I liked about this one is that Arturo fitted an Earvana* nut on it, which I think is a mandatory addition for anyone who wants to play really in tune.
If you think this is just another gadget I dare you to take your guitar, an accurate tuner, and write down how many notes are really in tune. Usually these are grouped around the 12th fret and start drifting away from good tuning as you get closer to the nut or bridge.
Here you have a chart showing the location of out-of-tune notes on the first half of the fretboard. The upper one shows a typical guitar and the lower an Earvana-equipped one.
Owners of recent Washburn USA*guitars know their chords sound more solid because they are built to comply with the Buzz Feiten* tuning system. I, however, prefer the Earvana nut for various reasons:
-It can be installed without altering the guitar (the original nut can be reinstalled anytime),
-You can use any tuning device (Buzz Feiten tuning have to use specially calibrated tuners).
-You can use a capo without compromising the correct tuning.
-It’s much cheaper ($35 US).
-Any luthier can install it using traditional methods. (Buzz Feiten system can be installed only by certified people after completing a special training in the USA: $140).
As every new nut, the Earvana needs to be adjusted to a comfortable playing action. In the following pictures you can see the original and the final height. You can also see in the first one how the strings pass over the nut, and later they are UNDER the top.
Once the action was set, I reshaped the top to make it look like it came that way from the factory.
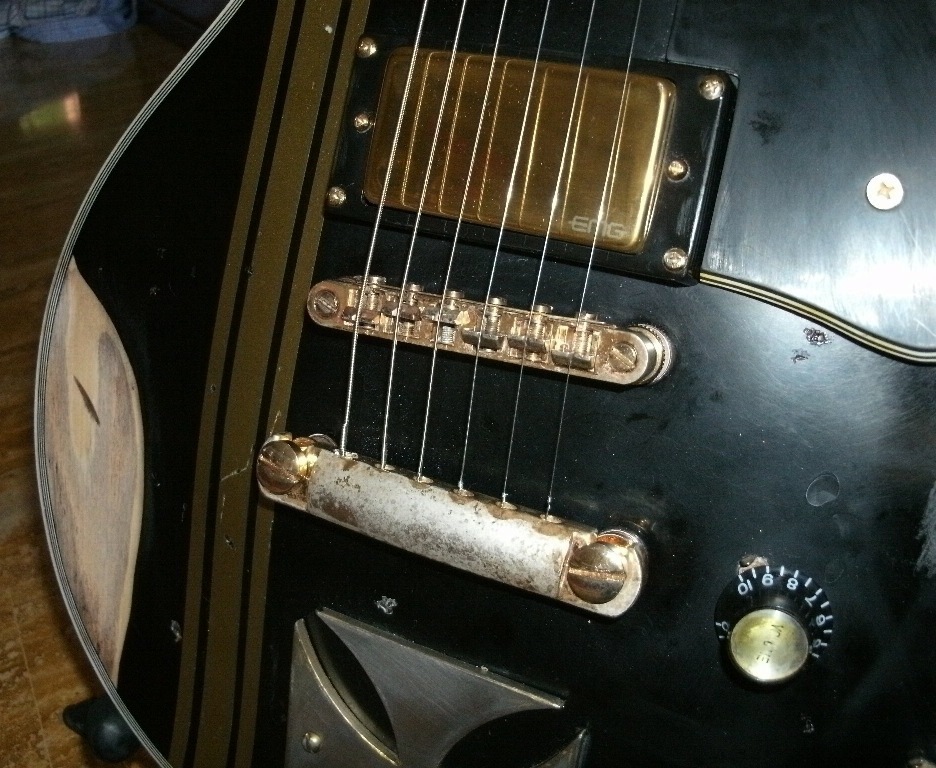
The bridge makes clear how the Earvana nut makes a difference. In the “before” picture (below, left), bridge saddles are adjusted like an stair, ascending from the fatter strings to the thinniest.
In the “after” picture (above right) saddles are closer together, especially in the treble strings. Since the Earvana nut gives an additional compensation at the other end of the string, the saddles doesn’t need to be adjusted to the limit. This will be excellent for acoustic guitars, where the simpler saddle can’t be made too thick.
Once I played it, the efectiveness of the new nut is self-evident: chords sound solid, like they do on a piano, without the usual trembling present in guitars. You gotta hear it to believe it!
*BTW, I’m neither related nor affiliated with the brands mentioned here. Altough I wouldn’t mind to!


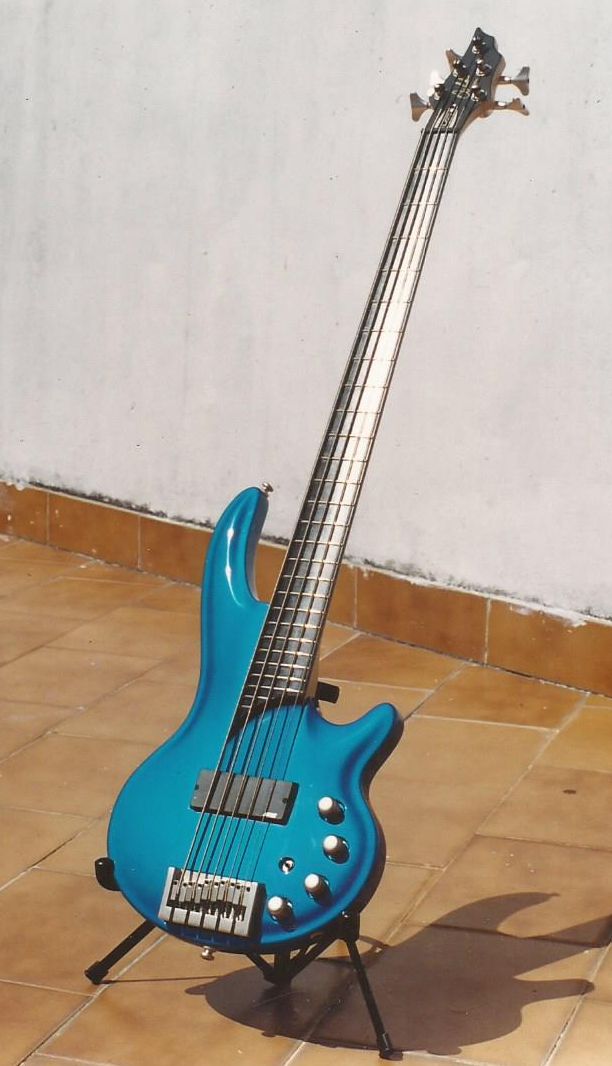 My faithful 5-string is a Curbow, specially designed by the late Greg Curbow to be crafted by the Cort factory in South Korea. My other options were a Steinberger Spirit XZ-25 and a Tobias Toby Pro 5. (This was way back in 2000, during the MusicYo! era).


